

I would say this card is Easy Going.
As I don't have any clear cardstock (something that I need to add to my already eye-popping long to-buy list) I used some of the backing that stamps come on that I have collected over the years. I cleaned the backing with a old t-shirt to get any unsightly film off them.
For this project I wanted to use my Background Basics: Herringbone. I love this set, but found the large image a challenge to stamp with good results. Perhaps I am merely stamping challenged, but if you also find yourself in this undesirable situation I can help by suggesting doing this:
- stamp into a foam pad or mouse pad;
- apply some force with your fingers onto the acrylic mount or stamp press enough so that the ink actually sticks to the paper;
- carefully flip over the acrylic block with the paper still stuck to the stamped image
- place a piece of scratch typing paper over the cardstock being stamped upon
- either use your fingers, brayer or a smaller acrylic block to evenly press all over the cardstock and stamp through the typing paper.
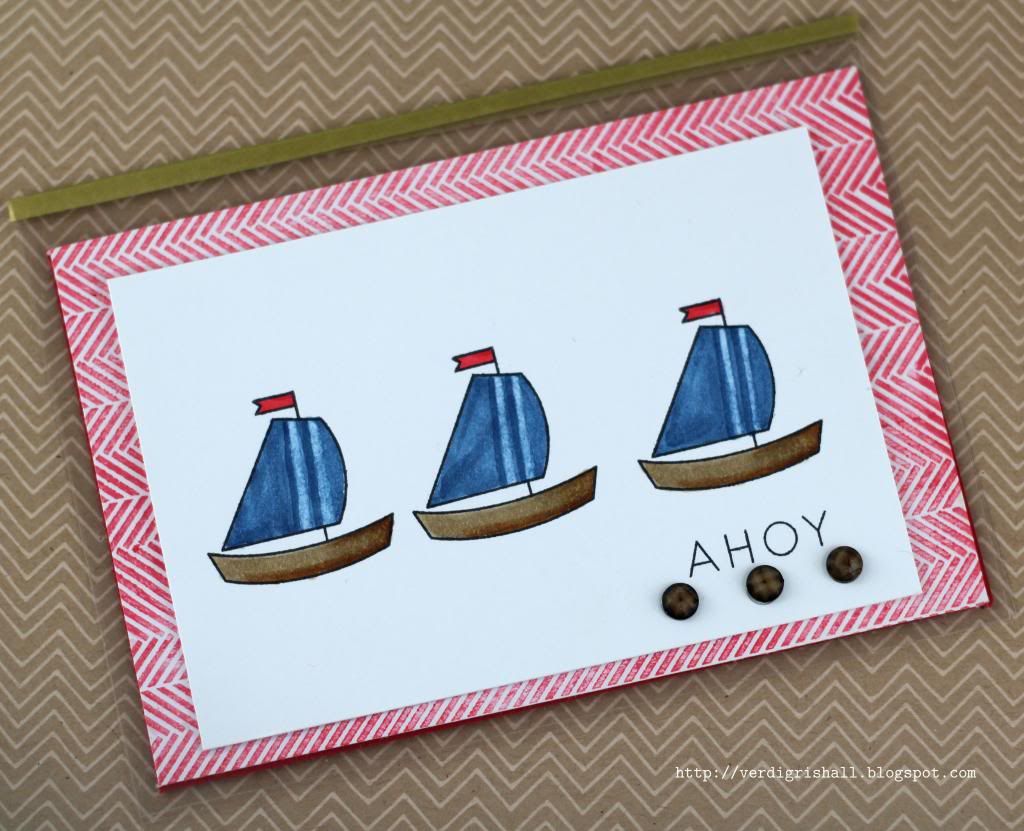
The little sailboats are from Bitty Baby Blessings which I stamped three times on a white piece of cardstock with black ink and then colored in with Copics. I wanted a little interest on the sails so added stripes using the Colorless Blender and edging it with the darker blue for them to stand out in contrast. The sentiment is also from Bitty Baby Blessings, but I decided not to include "little sailor". Somehow a smidgen of the ink from the "little sailor" part of the sentiment transferred although I swear I carefully wiped it all away. So that is why there are those three brown gems under "ahoy".
The herringbone panel is adhered on the opposite side of the clear card front with the sailboat panel adhered to the top of the cart front. A word of caution, take your time placing your panels down as once adhered they won't budge without damage thus why the cardstock panels on my card list (pun intended) to one side. The card front and back are adhered with a simple strip of gold washi.

I think this card could be given to a baby, boy or someone older with an interest in the sea and thus why I left out the "little sailor" of the sentiment. Also, this card could be used for various occasions depending on what sentiment was put inside (my inside is a simple red piece of cardstock).
Challenges Met: Papertrey Ink's Make It Monday #107: Clear Card & Copic Coloring Basics.
MOMM Tips:
MOMM Tip No. 1: Clearly fun. Try using acrylic cardstock or clear packing material to make a card. It is fun to play with the transparent aspect of acylic.
MOMM Tip No. 2: Don't fret mistakes. If you fumble a bit try to find a creative solution before tossing it and starting over. I covered up my mess up with a gem and like the card more for it and only I know the reason I added the embellishment.
MOMM Tip No. 3: Use your background stamps. Those stamps are marvelous for gender neutral designs that you can ink up in any color you want to match your project.
MOMM Tip No. 4: Modify your stamps as needed. There is no rule that you have to ink up the whole sentiment/image of your stamp. Ink up whatever part works for you.
And there you have it. I am firmly behind the nautical trend and you will probably see this theme appear in future Mondays (wait until I go anchor crazy!). Are you on board for all things nautical or rather see them walk the plank?
If you would like to play along leave a comment with a link to your creation(s). I am so excited to see whatever you make. Also, if you have any suggestions for products, inspiration, themes, colors, etc. please don't hesitate to leave me a comment.
Happy creating,
Shay.
Supplies:
Stamps: Bitty Baby Blessings and Background Basics: Herringbone: Papertrey Ink
Ink: pale tomato mid-tone shadow ink, Hero Arts; tuxedo black, Memento by Tsukineko
Cardstock: stamper's select white and pure poppy, Papertrey Ink
Other: acrylic; colorless blender (0); prawn (R24), cadmium red (R27), light grayish cobalt (B95), night blue (B97), sepia (E37), dull ivory (E43): Copic; gems, Studio Calico; gold washi
2 comments :
Super cute, love the little sailboat. Sometimes if I can't get a large background stamp to stamp evenly I take a large red eraser and go over the stamp a few times. This will rough up the stamp a little and make the ink adhere better, so it will stamp better. Thanks for sharing!
Cute and clever. Lots of great ideas and tips. This is great! Congrats!!!
Post a Comment