April 30, 2013

Man Oh Man Monday No. 8 (on Tuesday)

Hello and happy Monday...er Tuesday rather!  Great to have you visit again for another installment of Man Oh Monday.  Coming up in June is one of the mega man holidays: Father's Day.  In honor of such an auspicious holiday I have decided to dedicate all of May's Man Oh Man Mondays to Father's Day.  I hope you will join me in celebrating the fathers and father figures in our lives in May!  

Now on to today's cards (again rated Easy Going):

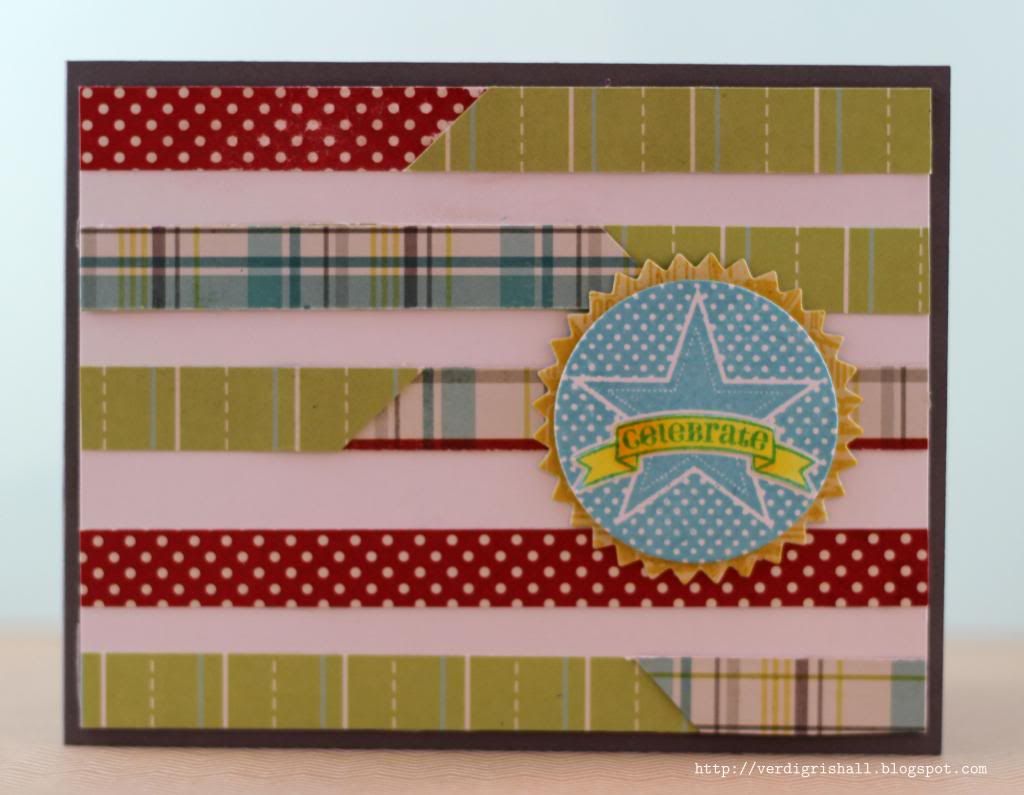
I was inspired by Papertrey Ink's Make It Monday #114 video by Dawn McVey to create a couple of cards using the Star Gazer Additions stamp set.  I chose to use Distress Markers for my cards, but if you have reinkers, watercolors, Distress Stains or Distress Paints this could work just as well.  You could even use the ink pad themselves in much the way I used the markers.  I used the markers in two different ways for these cards.

**Of note is that after I colored these images I let them dry overnight under a heavy object to help them to dry flat, but I placed them under a plastic object which meant they still were not completely dry so they are "artistic" and not flat.  If you prefer flat put them under a heavy non-plastic object perhaps even wrapped in water absorbent paper towels.  Just sayin'.

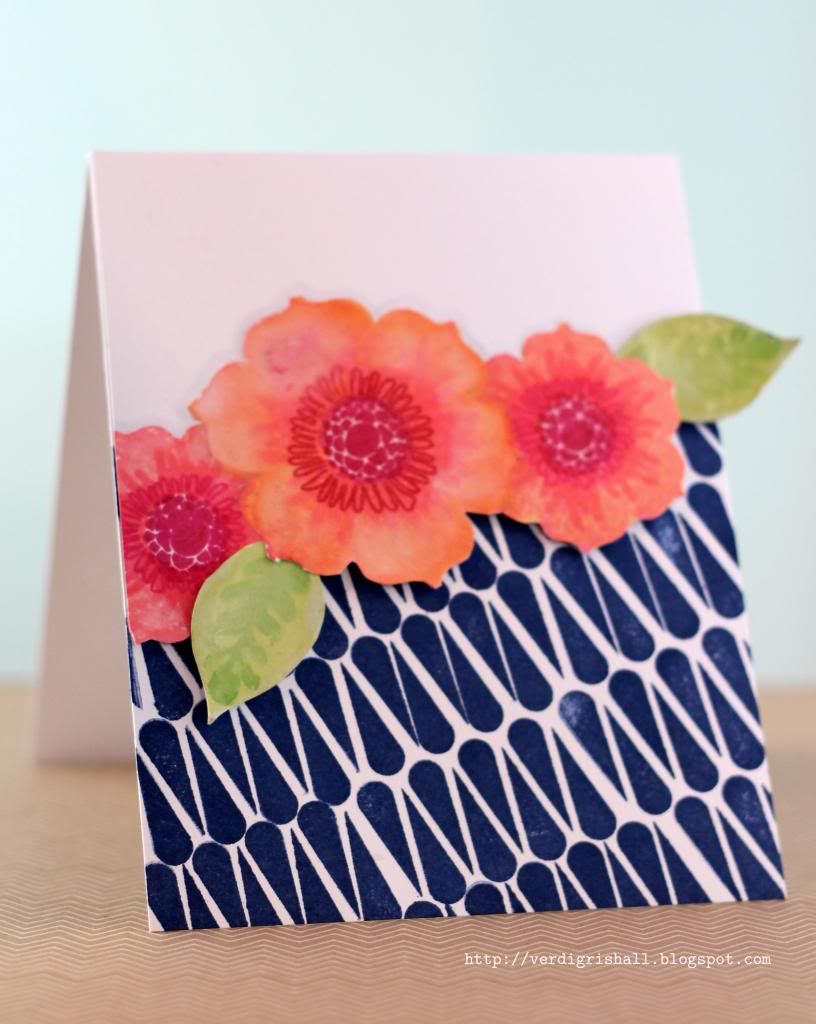
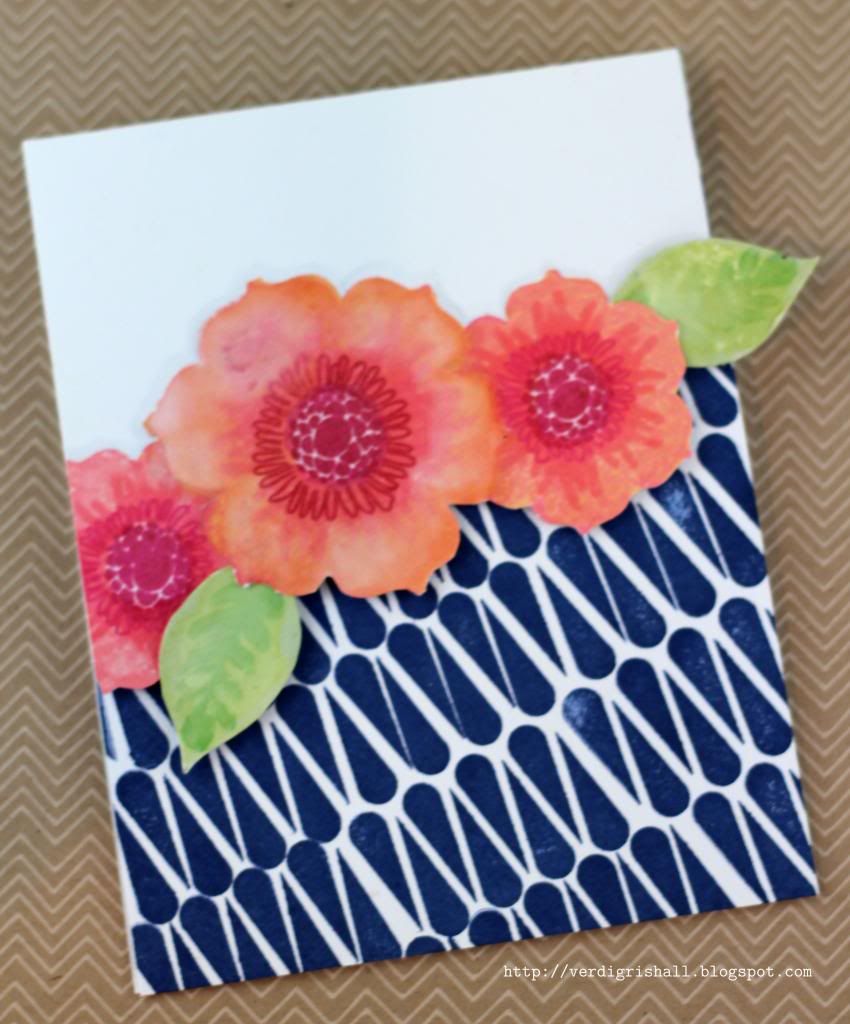
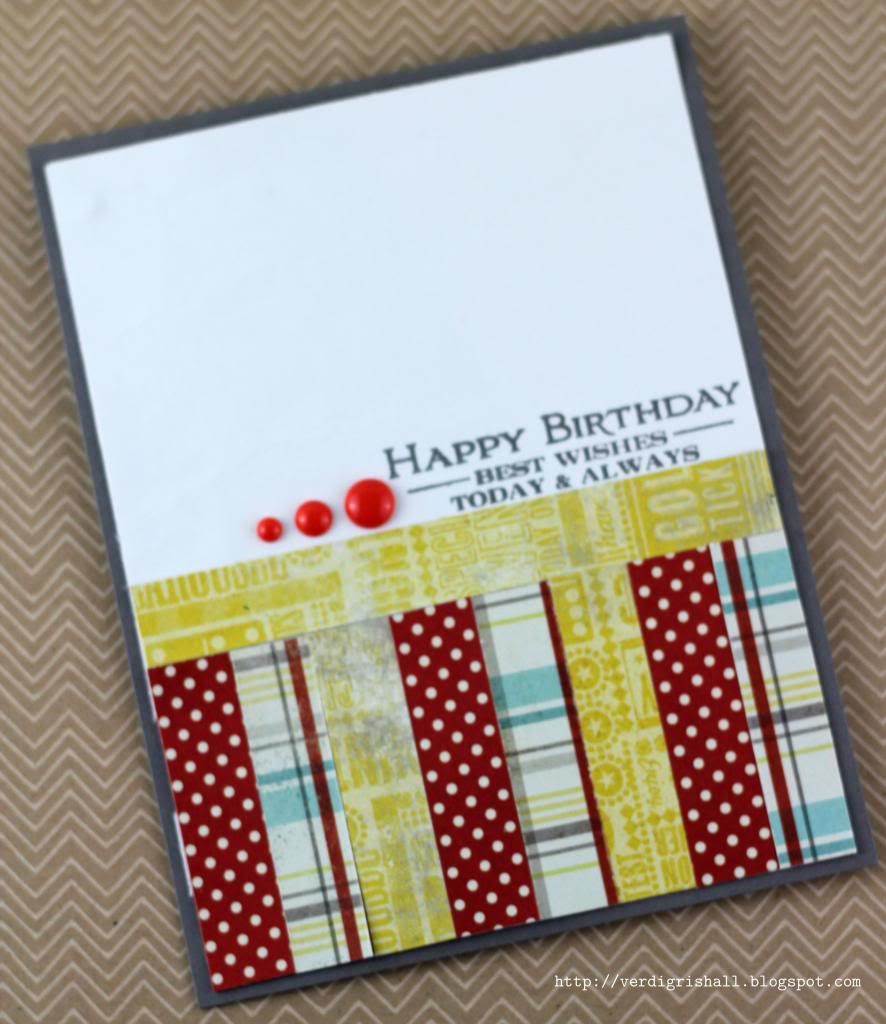
Card No. 1 | Simple Version


I white heat embossed the large image from Star Gazer Additions.  I scribbled the markers onto the Inkssentials Non-Stick Craft Sheet and then liberally sprayed the ink with water and picked up the color with a paint brush and dropped big drops over the image and then used the straw to blow the color in different directions.  I also flicked (best adjective I can think of and you may want to put a tarp over cover your work surface to avoid drops of color being everywhere!) smaller drops of color over the image and cardstock.


I added the panel to a piece of pewter cardstock and added a sentiment strip using dimensional adhesive. 


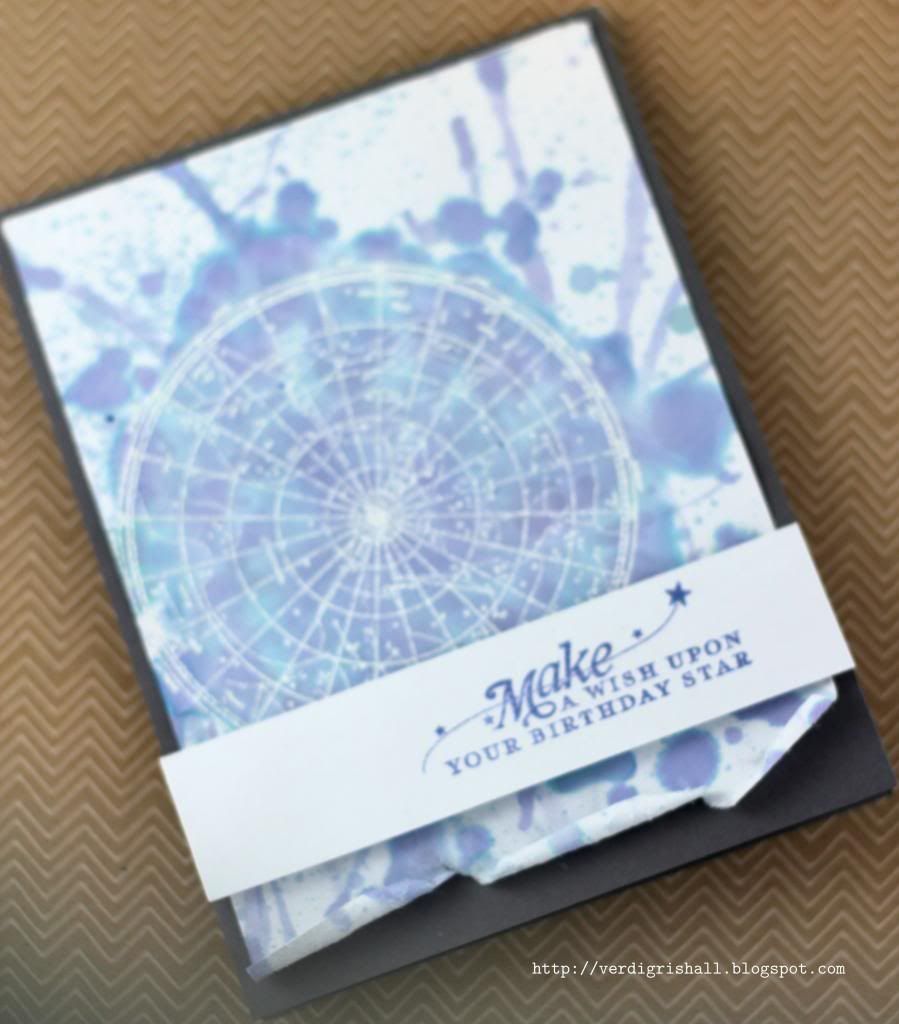
Okay, I have to admit that the torn bottom of this card is purely accidental...an adhesive mishap which I decided to just go with and sort of supports the whole tie-dyed Seattle circa 1992 grunge look,  I am sure tie-dying came about in much the same serendipitous way.

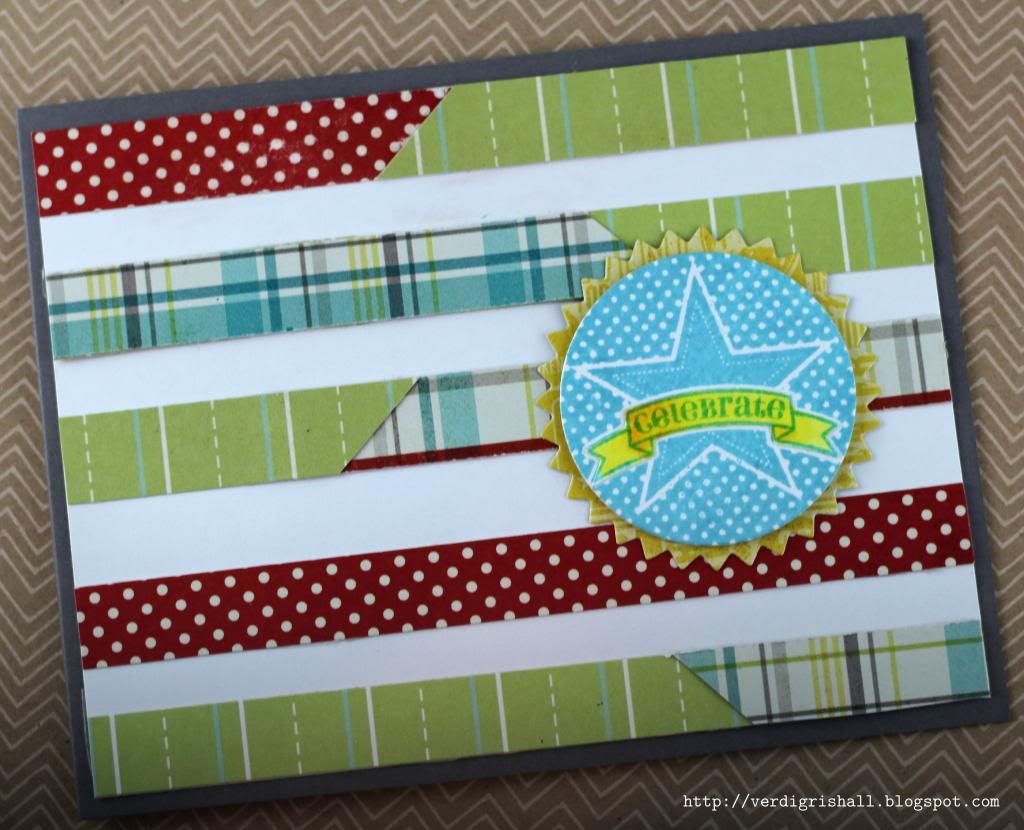
Card No. 2 | Flashy Version


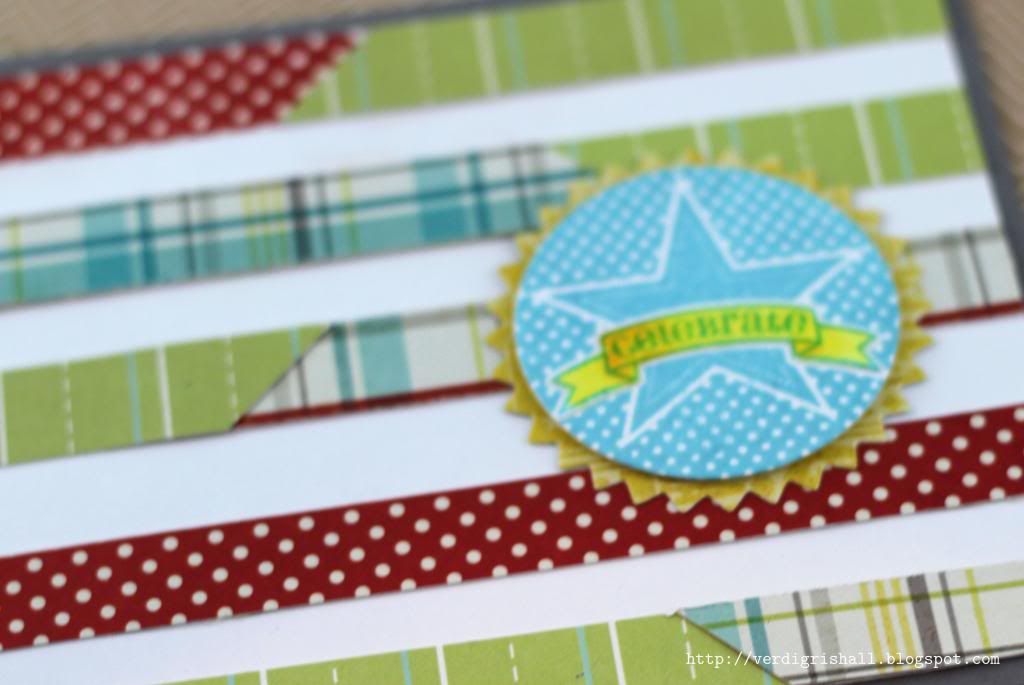
I gold heat embossed the large image from Star Gazer Additions.  I used the markers to color in the image directly.  I then used the paint brush to drop water onto the image (remember that Distress products are reactive to water...cool stuff!) and used the straw to blow the water in different directions.

I added the sentiment strip which was bordered by some gold (the color is actually brown sugar which I often prefer to the real gold color) glitter tape and added some wood veneer stars for added embellishment (confession: the wood veneer stars were a clever ruse to cover the fact that the top star from the sentiment didn't quite fit on my white strip).


The card base was painted with some of the Distress Markers and water. 


MOMM Tips:
MOMM Tip No. 1: Mix It Up.  Use the same products for different results.
MOMM Tip No. 2: Go For It.  Add that dash of drama.  A little gold is appreciated.
 
That {finally} concludes this week's MOMM.

If you have any suggestions or questions regarding the upcoming focus on Father's Day, just leave me a comment!  See you next week for our first MOMM Father's Day special.

Happy creating,
Shay.

Supplies:
Stamps: Star Gazer Additions, Papertrey Ink
Ink: Versamark, Tsukineko; stone wash shadow ink, Hero Arts
Cardstock: stamper's select white, Papertrey Ink; pewter, Neenah Paper
Markers: tumbled glass, broken china, stormy sky, faded jeans, chipped sapphire, dusty concord and pine needles, Tim Holtz Distress Markers by Ranger
Other: opaque white and detail gold embossing powder, JudiKins; Inkssentials Non-Stick Craft Sheet, Ranger; stars wood veneer, Studio Calico; brown sugar glitter tape, American Crafts; drinking straw; paint brush; water; spray bottle; dimensional adhesive

April 25, 2013

Papertrey Ink's April 2013 Blog Hop: Tilted


Welcome, welcome, welcome!  A bit a redundant, but I think I made you feel welcome, right?  I am so happy to have you visit today for my take on April 2013 Papertrey Ink Blog Hop's theme:


I know that there will be amazing projects featured by you.  Here is what I cooked up:

Card No. 1


First up this handy dandy card using the new Handy Hardware set which is perfect for masculine birthdays, congratulations, encouragement, forgiveness, thank you and father's day.  The inspiration for this card came from the over-the-top-talented Betsy Veldman from this card HERE (see the second card down with the saw?  Yes, that's the one...see the resemblance?).  I stamped planks of wood using Background Basics: Woodgrain on kraft then cut them into 1/2 inch strips, inked the edges and installed them at an angle upon my card.  An even easier version of this card could be made using the Background Basics: Farm & Barn, but unfortunately I don't own that set yet.  Perhaps you do though?  It would be worth a try.  I could also see this done in a weathered wood color scheme.  I love you woodgrain...4ever.

Card No. 2


For my next card I went a different more colorful and feminine route.  I love flowers, but strangely I don't use them all that much.  I could not resist the new Happiness in Bloom set with it's bold and fun florals and then the teardrop border.  Even before I received this stamp set I had designed the card which is very similar in design to the bottom right hand card on the inspiration picture by the always inspirational Maile Belles.  I used Distress Inks with the stamp set to create my border of flowers.  I did a bit of a watercolor effect as Distress Ink fills in better and blends better when sprayed with water.  I also masked off the largest flower so it is in the foreground.  I filled in some of the areas with watered down ink and a paint brush.  For added dimension I used a gray Copic marker around the flowers.  I cut around the bottom of the flowers and added the leaves.  The background was stamped repeatedly in navy.  I have a big crush on navy at the moment.  With dimensional adhesive I adhered the flower section to the card base. 

Card No. 3


Then I did another card...clean, simple and graphic this go around.  Diagonal stripes stamped asymmetrically on the top of the card using Background Basics: Super Stripes and finished off with Wonderful Words: Hello die cut from both POW! glitter paper and from a coaster for dimension.  Hello indeed!

Card No. 4
  

I used the negative block from the POW! glitter paper for the focal point of my last card.  The word was cut out of the paper at an angle.  Behind the glitter paper I stamped the hello from the Wonderful Words: Hello mini stamp set in raspberry fizz.  I adhered the POW! glitter paper using dimensional adhesive and voila it is one dy-no-mite card.
That's it from me.  Thank you so very much for stopping by and I hope to you come visit again soon! 

Happy hopping,
Shay.
Supplies:
Inks: soft stone, dark chocolate, limeade ice, aqua mist and raspberry fizz, Papertrey Ink; charcoal and navy shadow ink, Hero Arts; wild honey, dried marigold, worn lipstick, picked raspberry, fired brick, shabby shutters and mowed lawn, Tim Holtz Distress Ink by Ranger
Cardstock: stamper's select white and kraft, Papertrey Ink
Specialty Paper: POW! glitter paper in jade, American Crafts
Die: Wonderful Word: Hello, Papertrey Ink
Other: coasters, Papertrey Ink; Cool Gray No. 00 (C00) marker, Copic; ink blending tool and foam, Inkssentials by Ranger; Cuttlebug, Provo Craft


April 22, 2013

Man Oh Man Monday No. 7

Another Monday, another Man Oh Man Monday.  I hope this Monday is one of peace and reflection on the bounties and glory of nature as it is Earth Day.

In honor of Earth Day (in truth I only remembered it was Earth Day today, but it all works out in the end, right?), I am using the strips of patterned paper leftover from last week's MOMM cards to create new cards for today.  

Again I rate these cards as Easy Going as they can go to guys or gals, friends or coworkers, family or neighbors.  They are versatile, easily made as one or multiples and will work as a backup card to have in your card cache for any time you need a card in a pinch.

I began with my leftover strips of patterned paper as I mentioned all meassuring 1/2 inch wide and of varying lengths, but a few were a full 12 inches long.


I began with this diagonal stripe number.  I love that these strips of paper nestle snug right next to each other making this design a breeze to make.  I am really loving the wonderful words dies being released each month by Papertrey Ink.  Last month was birthday with a stamp set and coordinating word die.  I paired the birthday die with the happy from Papertrey Ink's Stylish Sentiments: Birthday stamp set.


Next I decided to make a card with vertical stripes topped with a single horizontal strip.  The sentiment is from the Boutique Borders: Birthday stamp set.  I finished with some enamel dots.


Lastly, is a horizontal stripe card with some overlapping all cut at a diagonal for some more interest.  The spacing is also not uniform nor is there much of a pattern. The focus of this card is the layered sentiment from 2012 Birthday Tags also by Papertrey Ink. 


MOMM Tips:
MOMM Tip No. 1: Recycle.  Use scraps from other cards.
MOMM Tip No. 2: Experiment.  Strips can be used in various directions and ways.

That's it for today's MOMM.  Hope to see you real soon.

Happy creating,
Shay.

Supplies:
Stamps: Stylish Sentiments: Birthday, Boutique Borders: Birthday and 2012 Birthday Tags, Papertrey Ink
Inks: charcoal shadow ink, Hero Arts; speckled egg, Jenni Bowlin for Ranger; broken china, Tim Holtz Distress Ink by Ranger
Cardstock: pewter, Neenah Paper
Patterned paper: harper's rule from elementary collection, Studio Calico; dilly dally "curious" and "hello" from miss caroline collection, My Mind's Eye
Dies: Limitless Layers: 1 3/4" Circle Collection and Wonderful Words: Birthday, Papertrey Ink
Other: boy crazy enamel dots, My Mind's Eye; dimensional adhesive; pale lemon (Y000), barium yellow (Y00), canary yellow (Y02) and lightening yellow (Y18), Copic markers

April 15, 2013

Man Oh Man Monday No. 6

Monday, Monday.  Sometimes Monday comes too soon and the weekend ends way too soon.  Still Monday can bring its own joys: a new beginning; a chance to catch up with office friends; and of course Monday now brings Man Oh Man Monday.  I know I may be the only one aware of it, but it sure does change how I think of Monday.

This Monday I am concentrating on patterned paper in the form of paper weaving. Yesterday, I made a simple paper weaving band to add to my card and today I am going to do a card front and a paper weaved border.

I would call these card Easy Going as they are pretty gender neutral.


I used one side of a paper weaved section to make the block and then flipped it over and used the opposite side for the border mitering the edges where they meet.  I recommend backing the parts of the paper weaving you choose to use with cardstock.

The stamps all come from Papertrey Ink today.

For the first card I simply added a sentiment and three enamel dots.  That is one simple card.  Changing up the patterned paper or exchanging it for cardstock would create a totally different look.


For the second card, I nestled the sentiments to fill in some of the rectangle created from the paper weaved border and finished up the sentiment block with a punched star.  I only added an enamel dot for a touch of color and texture.


MOMM Tips:
MOMM Tip No. 1: Use double sided patterned paper for your paper weaving as you can have twice as many options.
MOMM Tip No. 2: Cut up your paper weaving into blocks, strips or even shapes for all sorts of different possibilities.
Thanks for joining me for another MOMM and hope to see you next week!

Happy creating,
Shay.

Supplies:
Stamps: Headline Alphabet and Bountiful Banners, Papertrey Ink
Inks: charcoal and red royal shadow ink, Hero Arts
Cardstock: sand and pewter, Neenah Paper
Patterned paper: harper's rule from elementary collection, Studio Calico; dilly dally "curious" and "hello" from miss caroline collection, My Mind's Eye
Other: star punch, Stampin' Up!; remarkable "handsome" enamel dots from collectable collection, My Mind's Eye; quick-dry adhesive, Scotch; dimensional adhesive

April 14, 2013

Mama Elephant Sketch Challenge 03

Happy Sunday!  Today I am here with a quick card for Mama Elephant's Sketch Challenge 03.


Triangles and arrows are all the rage right now.  Perhaps I am not trendy, but with Mama Elephant stamps at least I can pretend to be!  For some reason I thought about paper weaving which became the the beginning of this card.  I picked out a rainbow, ombre triangle patterned paper from Studio Calico's Snippet 6x6 paper pad.  Ombre + rainbows + triangles = trend-tasticness!

Here is the card I came up with:


Fun, right?  I was happy that I was able to stack the sentiment from Geotagged over the bull's eye from On Target.  All of the arrows are from On Target as well.


I accented the patterned paper with three enamel dots following the sketch.


That's it for now, but I will be back tomorrow for Man Oh Man Monday.

Happy creating,
Shay.

Stamps: On Target and Geotagged, Mama Elephant
Inks: limeade ice and ocean tides, Papertrey Ink; charcoal, butter bar, soft cantaloupe and pale tomato shadow inks, Hero Arts
Cardstock: white, Georgia Pacific
Patterned Paper: Snippets collection 6x6 paper pad, Studio Calico
Other: He Said She Said (She Said) enamel dots, Teresa Collins; dimensional adhesive

April 8, 2013

Man Oh Man Monday No. 5

Happy Monday!

I am bringing you a very simple card today.  Men like simple, right?  Or at least some men do.  The card focuses almost entirely on a stamp I fell in love with by Paper Smooches called appropriately Dapper.  It is an amazing two-toned background that is perfect for guys as well as gals.  The design is fabulous and makes you look like a stamping pro (that of course you already know you are).

I would qualify this card as Easy Going.


I went with a fresh green and white color scheme (this would obviously be great for St. Patrick's Day too!).  I simply stamped Dapper once on a piece of white cardstock and then stamped the distinctive handwritten sentiment also by Paper Smooches sideways to the right.  I was going to leave it at that, but I decided to go with an added dash of flash in the way of matching glitter tape...dapper indeed!  I then adhered the white card panel to a green card base with dimensional adhesive and called it done.  Clean, simple and debonair which can be attributed to a fantastically designed stamp.  Thanks, Paper Smooches!  I don't think we've seen the last of Dapper.


MOMM Tips:
MOMM Tip No. 1: Use a well designed background stamp as the focus of your card.  With that one design you don't need much to dress it up.
MOMM Tip No. 2: Monochromatic can be magnificent.  Choose one color and go for it!

Have you used Dapper before?  What did you think?  Is there a background stamp that you have a design-crush on? 

Happy creating,
Shay.

Supplies:
Stamps: Dapper and Sentiment SamplerPaper Smooches
Ink: seed packet, Jenni Bowlin for Ranger
Cardstock: white, Georgia Pacific; new leaf, Papertrey Ink
Other: evergreen glitter tape, American Crafts; dimensional adhesive, American Crafts

April 5, 2013

Paper Wings Productions' April Design Team Blog Hop


Welcome Paper Wings peeps!

We’re going retro for this month's Paper Wing Production's Design Team Blog Hop and giveaway! If you've arrived here from Amber's blog, then you're in the right place. If you just happened to stumble into the hop, please CLICK HERE to start from the beginning.

This month we’re packing up our Paper Wings Productions stamps and traveling back in time to bring you some retro inspiration. We’re also giving away a gift certificate to Paper Wings Production’s online store to one lucky follower.

For a chance to win, all you need to do is:
  • be a follower of the Paper Wings Productions blog, The Aviary
  • visit each of the participating designer's blogs and leave them some love. Then go back to The Aviary and leave a comment letting them you completed the hop. 
  • to increase your chances of winning, like the Paper Wings Productions Facebook page and/or invite your friends to the hop. 
  • then just come back and let us know! Be sure to leave a separate comment for each of the additional entries. 
The winner will be announced on Tuesday, April 9th, 2013 on the The Aviary.

You ready to see what retro goodness I have in store for you?


Do you have items in your craft space which you have been holding on for years because you know one of these days you will use it?  I had these wood and glass coasters that were meant to be easily customized with photos or the like that I bought moons ago to create gifts, but I hadn't got around to it.  I was determined to use it for the retro theme. 


Coasters seem a little retro in itself and then when I decided to use the teacup image from Play with Your Coffee stamp set I thought this would be retro-iffic.  Not a word?  Well, it should be. 

I painted the wood of the coasters and their little wood container with metallic acrylic craft paint in blues and white until I got a color I wanted.


I went with a sort of preppy mid-century color scheme of navy, soft red/deep pink, orange, yellow and aqua.  Of course I added some polka dots using the solid double dots from Double Dot Border stamp set which is perfect for creating a random polka dot background and overstamped it with the handwriting from Writings Backgrounds or Writing.  The paper pieced teacups are stamped with the floral spray from Flower Power (or Mini Flowers) which is obviously a proper retro stamp set just going by its name.  With brown Copics I colored in the tea, coffee or cocoa.  A patterned paper strip behind the teacup along with banner ends stamped with life's simple pleasures from Marcel is just the right quaint old-timey sentiment and elements.


I then placed the teacup circles in the coasters and look at what a sweet gift they make all tied up with a bow.


Now it's time for your next hop into the past.  Make sure to head on over to Carrie's blog next!

***Here is the complete line up just in case you get lost along the way:

Lori Johnson Apgar - http://www.scrappinmystressaway.blogspot.com/
Dana Tatar - http://datatar.blogspot.com/
Norma Gomez - http://lilhoneybeestudios.blogspot.com/
Tara Chaussee- http://secretbeesstudio.blogspot.com/
Amber Rasmussen - http://sew-ink.blogspot.com
Shay - http://verdigrishall.blogspot.com/
Carrie Avery - http://www.carrieavery.com/
The Aviary­ - http://paper-wings-productions.blogspot.com/

Thank you so very much for visiting with me and have fun with this blast from the past blog hop!

Happy creating,
Shay.

Supplies:

Stamps:
Inks: pale tomato, pool, butter bar, orange soda and navy shadow inks, Hero Arts
Cardstock: white, Georgia Pacific
Patterned paper: Shoreline 6x6 paper pad, American Crafts
Paints: metallic blue sapphire, metallic blue pearl and metallic pearl white, Folk Art by Plaid; pearl turquoise, Lumiere by Jacquard
Other: Tape It Kits dies, Lifestyle Crafts; Cuttlebug, Provo Craft; sepia (E37) and light walnut (E57) markers, Copic; 05 precision pen, American Crafts; wood and glass coaster set

LinkWithin

Related Posts with Thumbnails