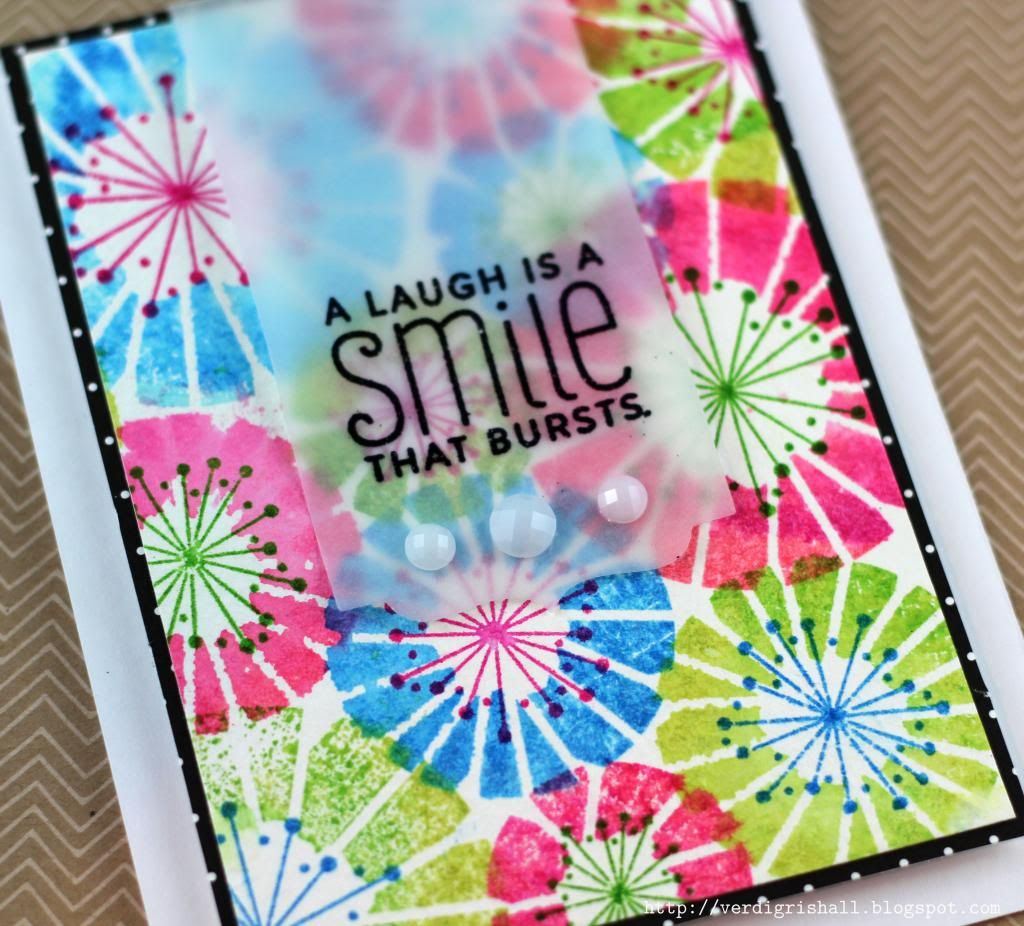
February 25, 2013

Papertrey Ink's February 2013 Blog Hop: Marvelous Monograms


Dear Reader,

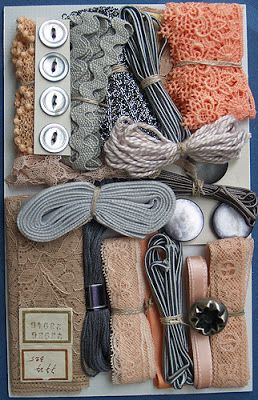
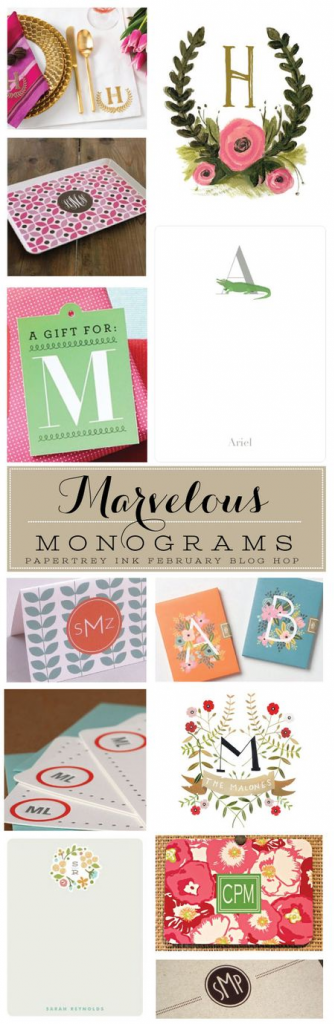
I am here tonight to share cards I made for Papertrey Ink's February 2013 Blog Hop: Marvelous Monograms.  Here was the challenge image to inspire our creations:


I pulled out a stack of Papertrey Ink stamp sets and set to work coming up with some cards.  I ended up with three, but I seriously could have made oodles more of them if I had started on this challenge earlier.   

Card No. 1:


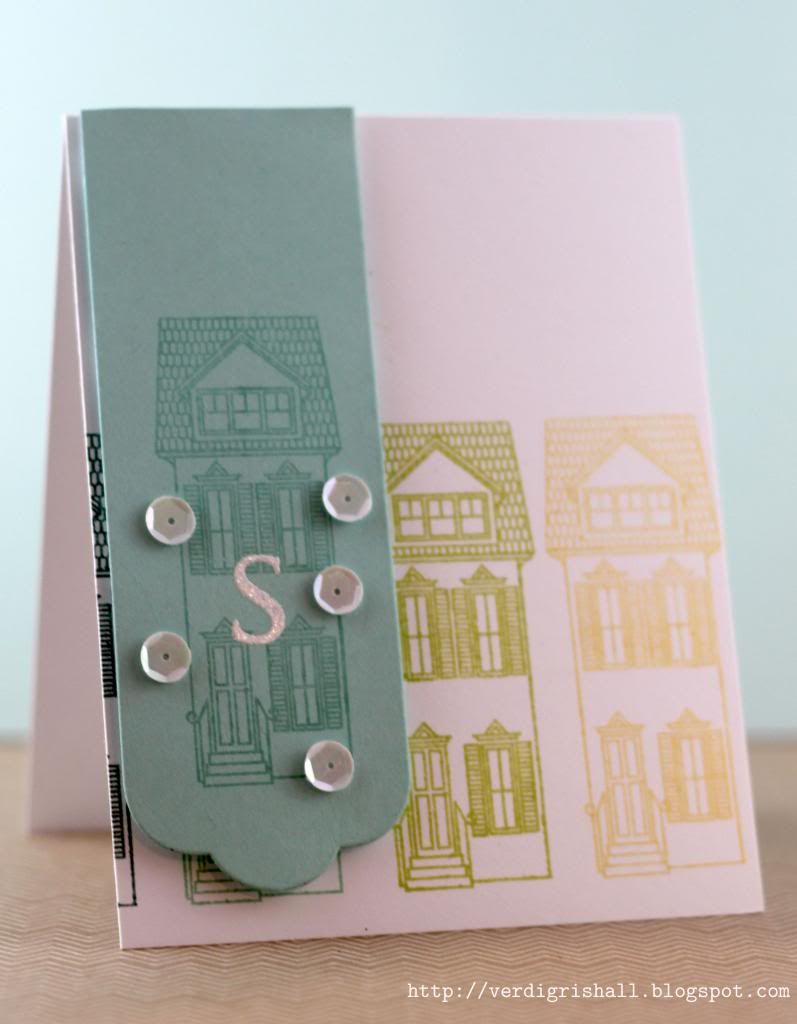
I stamped the townhouse from Boards & Beams in harvest gold, limeade ice, aqua mist and ocean tides.  I then cut out one of the Half & Half dies from aqua mist cardstock.  I stamped the townhouse on aqua mist on the aqua mist panel and then embossed the "s" in white embossing powder.  I adhered the panel to the card using dimensional adhesive.  Last is a sprinkling of white sequins.
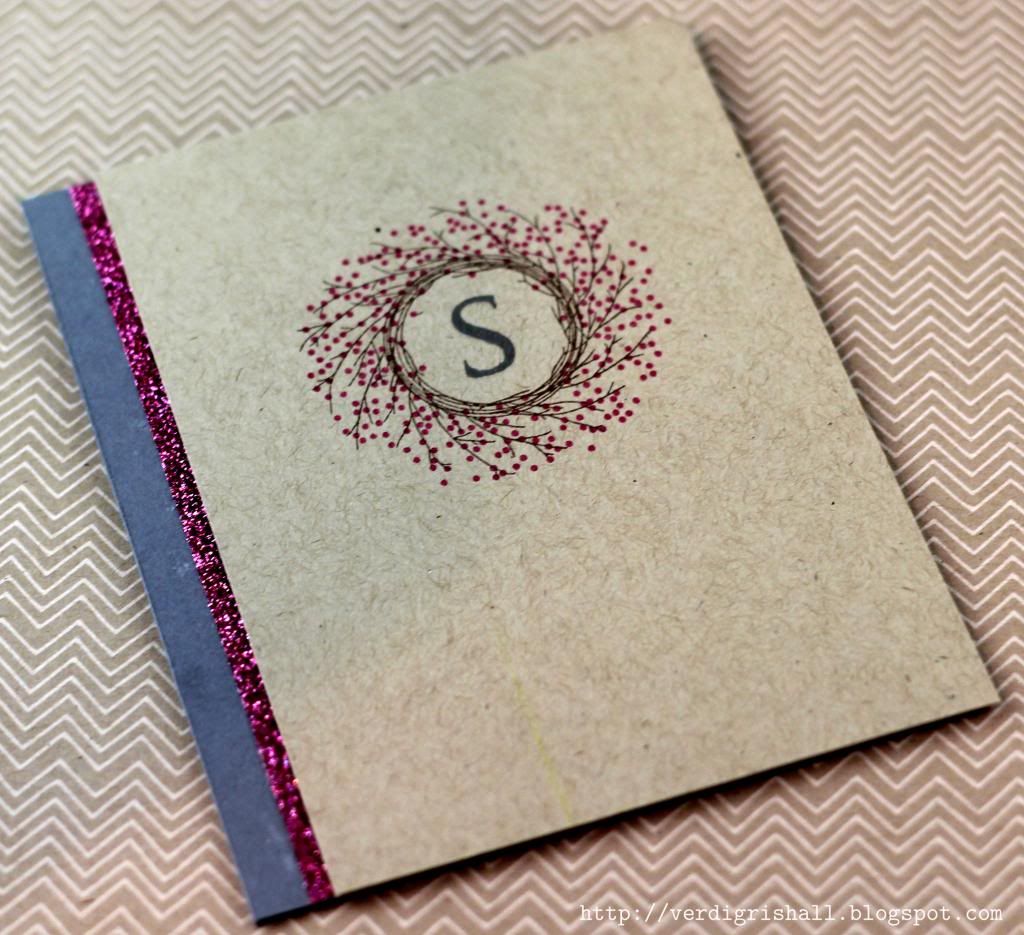

Card No. 2:


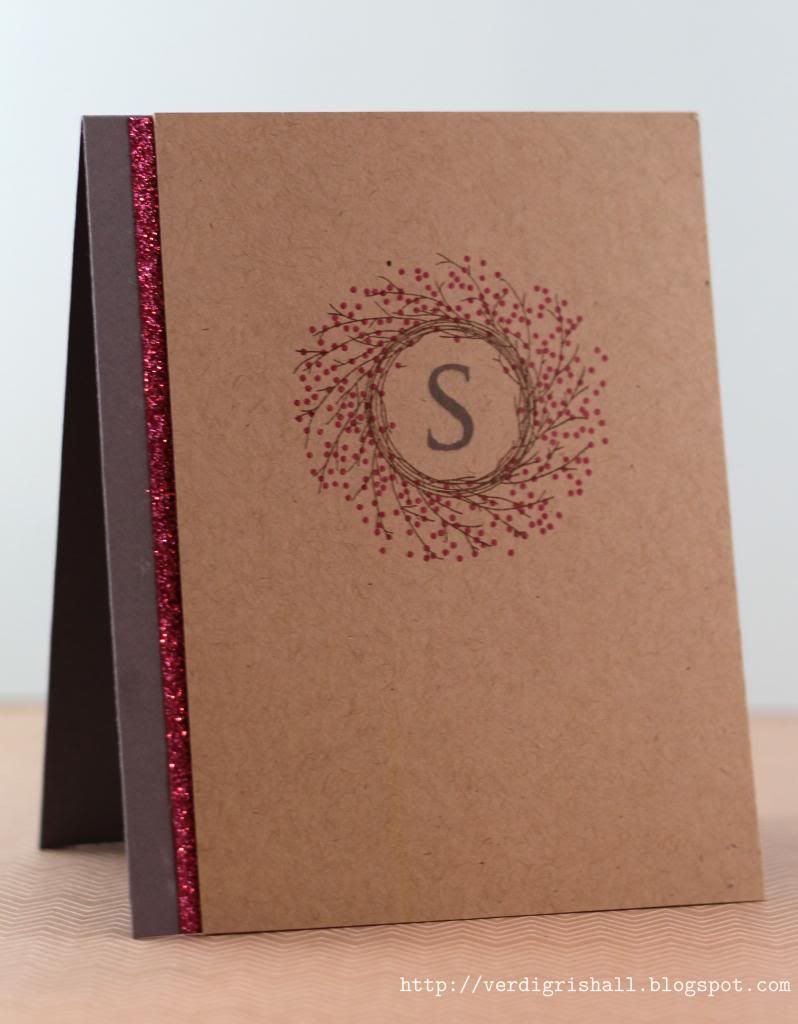
I stamped the twiggy wreath from Wreath From All Seasons with dark chocolate and over-stamped it with the berry wreath in raspberry fizz and stamped the "s" in charcoal on kraft cardstock.  On a piece of charcoal card base I adhered a strip of pink glitter fabric tape and over that I adhered the kraft panel with dimensional adhesive.
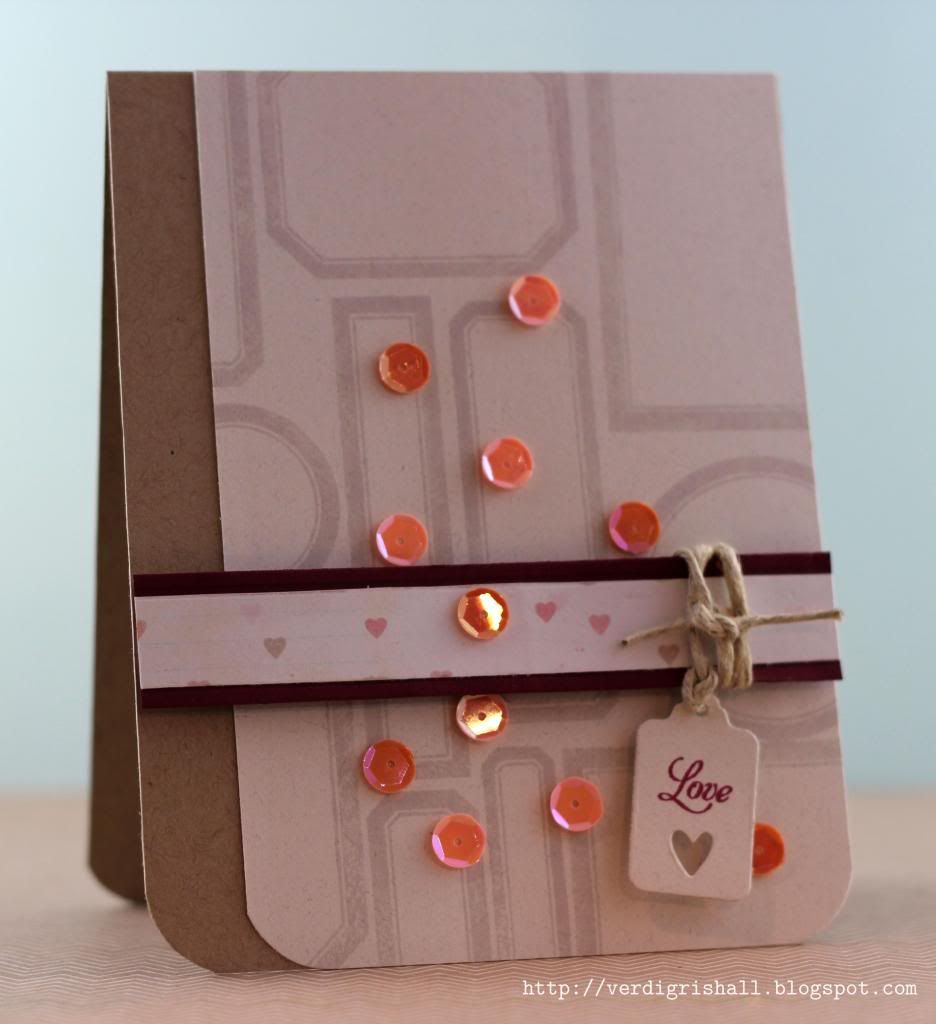
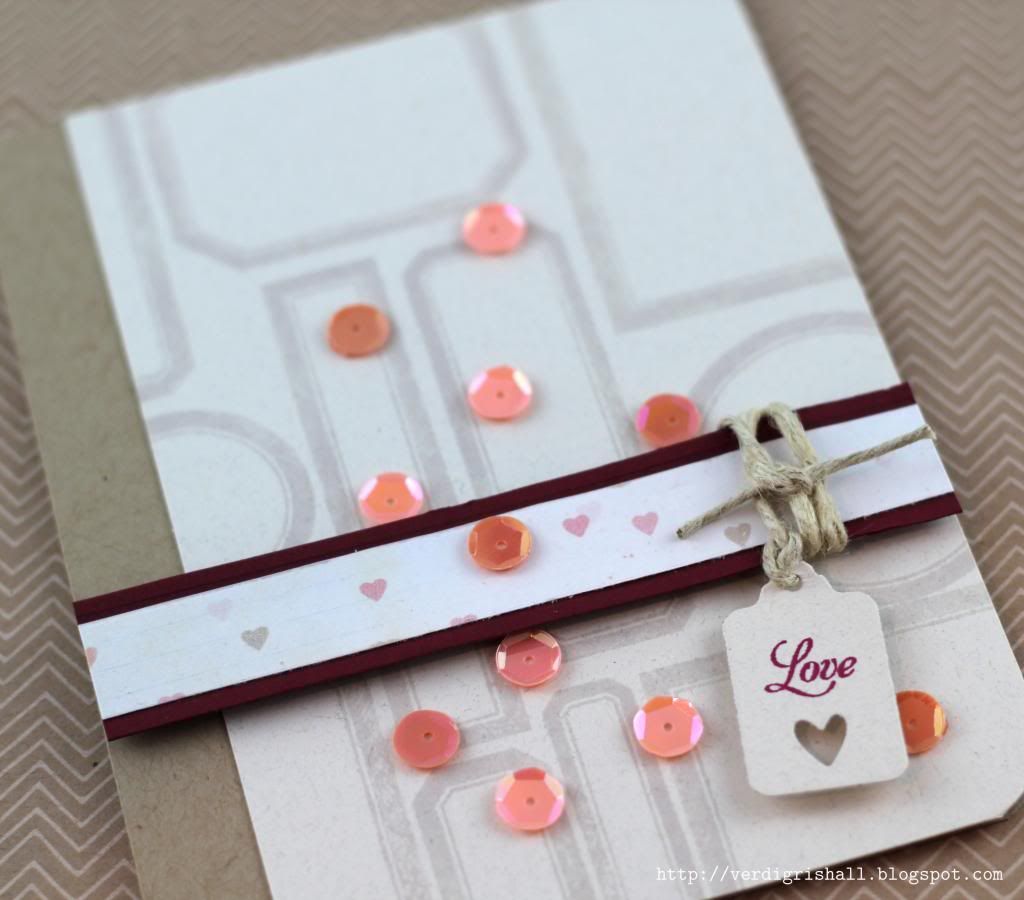

Card No. 3:


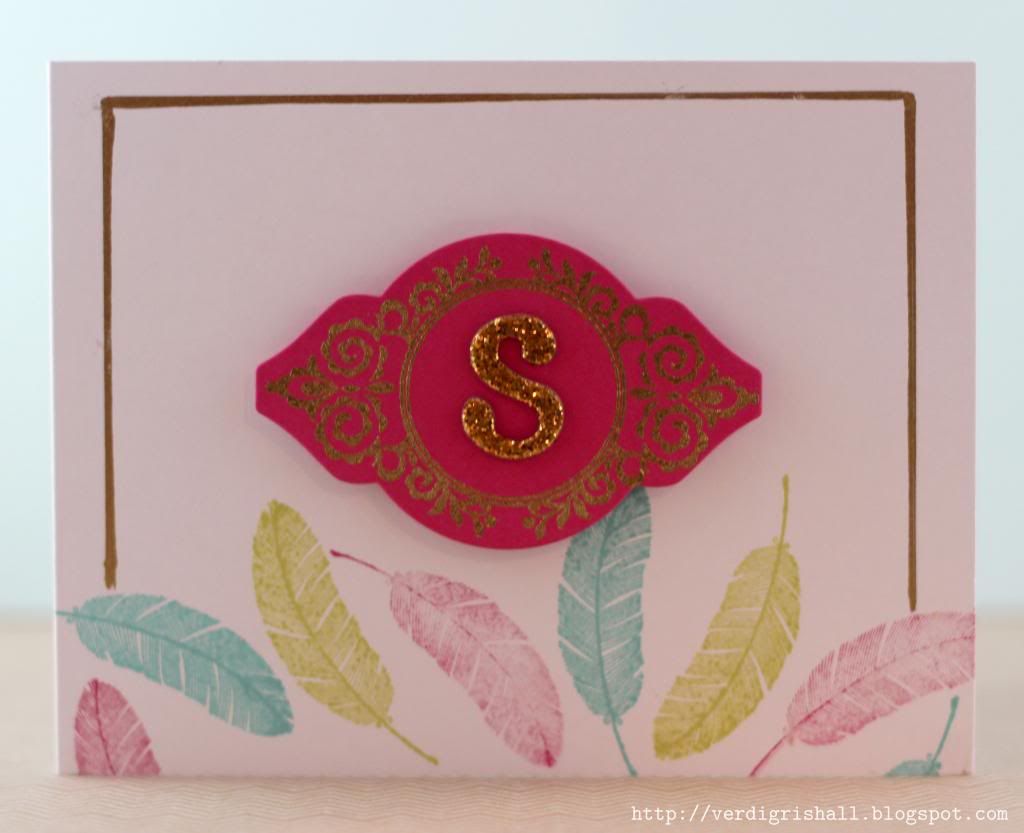
I stamped the feather from Happy Trails (love this stamp set!) in raspberry fizz, hawaiian shores and limeaid ice on a white card base.  I cut out the Mat Stack 2 die from raspberry fizz cardstock and embossed one of the frames from Mat Stack 2 Collection in gold.  I added an "s" from a gold glitter Thickers.  The Mat Stack is adhered with dimesional adhesive.  I added a frame using a gold leafing pen.


I hope you have enjoyed my takes on the Marvelous Monograms challenge.  Thank you so very much for visiting!

Happy creating,
Shay.

Supplies:
Stamps: Trajan: Monogram Edition, Board & Beams, Wreath For All Seasons, Happy Trails and Mat Stack 2 Collection, Papertrey Ink
Ink: Harvest Gold, Limeade Ice, Aqua Mist, Ocean Tides, Raspberry Fizz, Dark Chocolate and Hawaiian Shores, Papertrey Ink; VersaMark, Tsukineko; Charcoal Mid-Tone, Hero Arts Shadow Ink
Cardstock: Stamper's Select White, Aqua Mist, Kraft, Raspberry Fizz, Papertrey Ink; grey, Neenah Paper
Other: Half & Half Die Collection and Mat Stack 2 Die, Papertrey Ink; Cuttlebug, Provo Craft; opaque white and detail metallic gold embossing powders, JudiKins; white sequins; pink glitter fabric tape; gold glitter sunrise Thickers, American Crafts; gold leafing pen, Elmer's

Moxie Fab World's Tuesday Trigger: Set the Table

Dear Reader,

I am back after the Oscars to squeeze in an entry for Moxie Fab World's Tuesday Trigger: Set the Table.


And here is my take on the Trigger:


I was inspired by the colors, shapes of the plates, the linen and silverware.  I chose an older patterned paper from Basic Grey's Nook & Pantry collection which has a linen design to cut a couple of circles from with a circle of gold sandwiched in between.  The other patterned paper is a pale grey by Basic Grey from their Basics collection with a distress that reminds me of the tarnished silverware.  I stamped a sentiment onto a strip of vellum which reminds me of the shape of a napkin using Mama Elephant's Midnight Letters (can't get enough of them since I finally inked them up this week) in a brown ink I stamped off once before stamping upon the vellum and gold glitter Thickers.  The sentiment is part of a quote from the great movie "Auntie Mame" (the rest of the sentiment is: "...and most poor suckers are starving to death").  On the main circle I stamped utensils with soft stone which peeks through the vellum very subtly.  I attached the vellum to the card by hand sewing with gold thread.  With enough practice I may become a mediocre sewer.  One can dream.

I am off to get some sleep.  Have a marvelous Monday!

Thank you so much for stopping by for a visit,
Shay.

Life is a Banquet card
Stamps: Midnight Letters, Mama Elephant; utensils, Teresa Collins/Stampers Anonymous
Ink: brown sugar, Jenni Bowlin for Ranger; soft stone, Papertrey Ink
Paper: metallic gold cardstock, stash; vellum
Patterned paper: census from Basics collection and waffles from Nook & Pantry collection, Basic Grey
Other: gold glitter sunrise Thickers, American Crafts; Sew Easy Stitch Piercer, We R Memory Keepers; gold metallic thread, Coats; circle and scallop circle Nestabilities dies, Spellbinders; Cuttlebug, Provo Craft

February 24, 2013

Papertrey Ink's Make It Monday #104: Handmade Pinwheels

Dear Reader,

I found myself taking some time off blogging this week and was enjoying being the observer of beautiful art, creating and crafting that happens all over the world.  I did make a card during my siesta.   This week's Make It Monday #104: Handmade Pinwheels caught my attention.  Does anyone else remember the show "Pinwheel"...as in "pinwheel, pinwheel spinning around look at my pinwheel and see what I found?"  Good times.  Anyway, Ashley Cannon Newell did a video showing a couple of options for making pinwheels that are super easy, but so fun and capture the happiness from childhood.


I went with cutting a larger square and a smaller scalloped square to create a double layer pinwheel.  All the patterned paper for this card come from Dear Lizzy's Neapolitan collection.  This may be a slightly older collection, but it is gorgeous and perfect for spring and summer which can be mixed up with other Dear Lizzy collections or numerous collections and products.


I stamped the lined ray from Hello Sunshine in yellow on piece of white cardstock cut from Tag Sale #5 Die...this is an endlessly useful shape and paired with the Wine Bottle Tag Die makes an instant statement.  I added a little border of the floral design (from a strip found on the sea breeze paper) to each side of the Wine Bottle Tag Die.  I adhered my pinwheels to the tag and then adhered it all to a piece of white cardstock.  I stamped the sentiment in soft stone ink.  Last touch was a yellow enamel dot to the center of the smaller pinwheel.


There you have it...a pretty pinwheel card. 

I hope you have a delightful Sunday and enjoy the Oscars!

Happy creating,
Shay.

A Note of Thanks card
Supplies:
Stamps: Hello Sunshine and Happy Trails, Papertrey Ink
Ink: lemon drops, Jenni Bowlin for Ranger; soft stone, Papertrey Ink
Cardstock: white, Georgia Pacific
Patterened Paper: Sea Breeze and Cheerful Notes from Neapolitan collection, Dear Lizzy/American Crafts
Other: square and scallop square Nestabilities, SpellbindersTag Sale #5 Die and Wine Bottle Tag Die, Papertrey Ink; Cuttlebug, Provo Craft; The Sweetest Thing Honey "Love" Enamel Dots, My Mind's Eye

February 18, 2013

Simon Says Stamp Challenge: White on White

Dear Reader,

First, I wanted to welcome all the new followers to my little blog as well as all of the kind comments.  Thank you so much!  It is a real joy and honor.
 
Now on to tonight's offering.
 
 
I took on the Simon Says Stamp! challenge from their challenge blog for the first time--the White on White challenge.  I won't lie I did some struggling with this one especially as I pulled out the Sew Easy for the first time.  It wasn't the actual tool that was the problem, but my inability to sew.  Talk about a learning curve!


I used two embossing folders from the Fabric Swatches Set by Cuttlebug to add some texture and interest.  I decided to use the Midnight Letters from Mama Elephant...I have been wanting to use this stamp set (oh so cool!) and they were the perfect size to fit in the squares.  I added just a touch of pale grey. 

I hope you enjoyed my card.  Thank you so much for visiting.  Have a terrific Tuesday!

Happy creating,
Shay.

Wish Big Card
Supplies:
Stamps: Midnight Letters, Mama Elephant
Ink: soft stone, Papertrey Ink
Cardstock: white, Georgia Pacific; grey, stash
Other: Fabric Swatched Set embossing folders, Cuttlebug; Cuttlebug, Provo Craft; Sew Easy Stitch Piercer Handle and zig zap attachment, We R Memory Keepers; circle and scallop circle Nestabilities, Spellbinders; white embroidery floss (25), DMC; fresh snow buttons, Papertrey Ink; brad setter & piercing tool, We R Memory Keepers

February 17, 2013

Moxie Fab World's Tuesday Trigger: I've a Notion

Dear Reader,

It was one of those days when a 20 minute chore blossomed into a 2 hour project.  I don't mean the card I am going to share with you presently...I was able to fit working on it today in fits and starts.  It began with an image from Moxie Fab World for it's Tuesday Trigger: I've a Notion:


I am digging the peach/melon/orange and grey color scheme and I love the notions.   I thought why not make a card with the colors and the design of this picture?  It may be pretty literal, but I had fun.


I got out my Label Basics stamp set from Papertrey Ink again as this card HERE sparked the basis of this card only this time around I was very specific about where I placed the shapes and also paper pieced.  I searched my collection of 6x6 paper pads for various patterned papers that worked for the color scheme and sort of followed the picture for placement.  I added a piece of lace dyed with very watered down Mister Huey's for a peach color, baker's twine, three grey buttons and a little silver embossed vellum square for the sentiment.

I hope you enjoyed tonight's card!  Have a great beginning to your week.

Happy Creating,
Shay.

I've a Notion Card
Supplies:
Stamps: Label Basics, Borders and Corners Square and Tiny Tags, Papertrey Ink
Ink: soft stone, Papertrey Ink; VersaMark, Tsukineko
Cardstock: grey, stash
Paper: vellum
Patterned Paper: Plumeria 6x6 paper pad, Basic Grey; Tangerine and Honey the sweetest thing 6x6 paper pads, Love Me 6x6 paper pad and Nostalgia 6x6 paper pad, My Mind's Eye; Paper Heart 6x6 paper pad, Crate Paper; Now & Then 6x6 paper pad, Teresa Collins; and Hello Friend 6" Glitz Paper Pack, Glitz Design
Other: buttons from Sasaparilla collection, October Afternoon; Lucille Mister Huey's Color Mists, Studio Calico; grey and white baker's twine, Divine Twine by Whisper Graphics; silver embossing powder, Ranger; circle nestabilities dies, Spellbinders; Cuttlebug, Provo Craft; dimensional adhesive

February 14, 2013

Papertrey Ink's 6th Anniversary: Boutique Accessory Challenge

Dear Reader,

Today on Nichole Heady's blog is a different challenge in honor of Papertrey Ink's 6th Anniversary: a boutique accessory challenge to make something to adorn your person.  This is certainly a challenge for me...in fact I considered sitting this one out.  Still we don't grow unless we push ourselves, right?  So I pushed myself.  Actually the hardest part of my project was locating a needle after recently going through a large reorganization of my studio.


I have one piece of felt from Papertrey Ink in true black so that is where I began.  I cut out of it with the middle sized die from delightful doilies die collection.  A little aside: this was my first time using the felt and like others have mentioned before it cut like a dream.  I found a cool black and gold mesh fabric in my stash that I cut a couple of hearts out of.  I attached the layers by sewing on buttons for a punch of color.  I added a hair tie to the back of each piece.


I decided to decorate a tag to place the hair ties upon for presentation or gifting.  I used aqua, red and black inks to stamp images from Delightful Doilies.  The tag ended up too busy so I added a layer of vellum that I attached with a piece of ribbon and tiny attacher.  Before I attached the vellum I added an edge of gold with a gold leafing pen.


It is pretty elementary, but I am happy I attempted this challenge.  I hope your day was a delightful one!

Thank you so much for visiting.

Happy creating,
Shay 

Supplies:
Stamps: Delightful Doilies, Papertrey Ink
Ink: speckled egg, chili powder and fountain pen, Jenni Bowlin for Ranger
Paper: vellum; manila tag
Other: delightful doilies die collection, Papertrey Ink; true black felt, Papertrey Ink; aqua mist twill tape, Papertrey Ink; holiday mix vintage button mix, Papertrey Ink; black emboidery floss (no. 310), DMC; gold leafing pen, Elmer's; TIm Holtz Tiny Attacher

February 13, 2013

Lawnscaping Challenge No. 51: Be My Valentine!


Dear Reader,

I am back with another Lawnscaping Challenge entry.  This time it's all about Valentine's...Lawnscaping Challenge No. 51: Be My Valentine! 

I was inspired by the circle of hearts in the right hand corner and the colors of white, pink and chocolate.  Here is what I came up with:


I started out by cutting hearts from white tissue paper that I then spritzed with pink spray.  I arranged them on a piece of white cardstock and stamped the heart from Bee Mine on each heart.  I added some gold thread to the center and finished the heart flower with a gold embossed heart.  I stamped the herringbone/chevron stamp from Interlocking Backdrops in pale pink and stamped happy valentine's from Happy Everything in brown ink.  I then shook drops of pink and white spray onto the entire panel.  I adhered it all to the piece of chocolate brown cardstock gold embossed with the heart border from Belinda's Borders.

That's it from me tonight.  Thank you so much for stopping by and I hope your Valentine's day is filled with a whole lot of love and chocolate.

Happy creating,
Shay.

happy valentine's card
Supplies:
Stamps: Bee Mine, Belinda's Borders,  Happy Everything and Interlocking Backdrops, Lawn Fawn
Ink: VersaMark, Tsukineko; chewing gum and cough syrup, Jenni Bowlin for Ranger; cup o' joe mid-tone shadow ink, Hero Arts
Cardstock: dark chocolate, Papertrey Ink; white, Georgia Pacific
Other: detail metallic gold embossing powder, JudiKins; pink baloon Sprinklers, October Afternoon; calico white Mister Huey's Color Mists, Studio Calico; gold thread; white tissue paper; dimensional adhesive

Papertrey Ink's 6th Anniversary: Watercolor Challenge

Dear Reader,

How are you this Tuesday night/Wednesday morning?  I happily spent a few hours playing with ways to watercolor thanks to the watercolor challenge on Nichole Heady's blog for Papertrey Ink.

My first card uses emboss resist which I have always loved and watercoloring using Tim Holtz Distress Markers, water and a paint brush:


I cut a panel from watercolor paper and embossed the largest image from Stitches & Swirls.  As I mentioned I used Distress Markers, water and paint brushes to paint in the image.  I scribbled onto my crafting mat and then picked up the color using my brush, adding water as needed.  When I finished painting in the image, I was worried that it read as being outdated so I tried to be more edgy or trendy with the rest of the card.  I stamped that lovely sentiment from Happy Trails.  I added a little stitched tail after the sentiment with a black soot Distress Marker.  You notice the little melon berry banner with the pearl?  That was used to cover up a mess up on my part.  I added the kraft photo corners for interest.  I adhered the watercolor panel to a distressed piece of melon berry cardstock and then to a piece of smokey shadow cardstock at a slight angle.  Everything was then placed on a kraft card base using dimensional adhesive.  I am pretty happy with the finished card and I adore melon berry, smokey shadow and kraft together...how about you?

For my next two cards I wanted to do a different watercolor technique in really bold colors and images.  I pulled out the Funky Florals stamp set and Tim Holtz Distress Inks and went to town: 


Each time I stamped a flower I first inked up the image in the lighter hue and then added a little of the darker hue (for instance first worn lipstick and second picked raspberry) Next I lightly spritzed water on the stamp before stamping it on a piece of watercolor paper.  I covered the whole piece with flowers in 3 sizes and 3 colors.  Then I stamped in the burst centers.  The watercolor panel was large enough to cut in half once I finished to make two cards.  I adhered each watercolor panel to a piece of black bitty dot patterned paper.  I cut out one of the half & half die collection using vellum twice which I embossed with black embossing powder using a sentiment from Funky Florals and Half & Half.  I added enamel dots and gems to the vellum and adhered it to the watercolor panel which I then adhered to a white card base. 

There you have it.  I had a blast (people still say that right?) playing with watercolor techniques and need to remember to revisit it to try even more.

Thank you so much for joining me and I hope you have a bright and happy day!

Happy creating,
Shay.

a note of thanks card
Supplies:
Stamps: Stitches & Swirls and Happy Trails, Papertrey Ink
Ink: VersaMark, Tsukineko; basic gray, Stampin' Up!
Cardstock: melon berry, smokey shadow & kraft, Papertrey Ink
Paper: cold press watercolor 400 series, Strathmore
Other: double-ended banner die, Papertrey Ink; Cuttlebug, Provo Craft; Tim Holtz Distress Markers, Ranger; opaque white embossing powder, JudiKins; dimensional adhesive; kraft photo corners; pearl; paint brush, water

bold and funky cards
Stamps: Funky Florals and Half & Half, Papertrey Ink
Ink: worn lipstick, picked raspberry, shabby shutters, mowed lawn, tumbled glass, salty ocean, Tim Holtz Distress Ink by Ranger; VersaMark, Tsukineko
Cardstock: white, Georgia Pacific
Paper: cold press watercolor 400 series, Strathmore; vellum
Patterned paper: black from 2008 Bitty Dot Basics Patterned Paper 8x8, Papertrey Ink
Other: half & half die collection, Papertrey Ink; Cuttlebug, Provo Craft; detail black embossing powder, JudiKins; Lost & Found 3 Ruby enamel dots, My Mind's Eye; opaque gems, Studio Calico; dimensional adhesive, spray bottle, water

February 11, 2013

Papertrey Ink's 6th Anniversary: Color Inspiration No. 5

Dear Reader,

Tonight found me scrambling to come up with a card after I spent a good bit of time unpacking my Studio Calico box full of my February goodies after I got home from work.   It is a good day when my Studio Calico box is delivered by my friendly UPS guy.

Anyway, Nichole Heady of Papertrey Ink challenged us with six color inspiration options.  You can find out more about it HERE.

I went for a soft pretty color combination which is different than my norm:


This is the card I created using the colors (perhaps you can see that I was inspired by Maile Belles?):


I started my card by stamping nearly every image from Label Basics in soft stone ink on a piece of cardstock that is similar in color to fine linen.  I rounded the bottom corner of the cardstock and adhered it to a kraft card base rounding the bottom corners.  I cut a piece of scarlet jewel cardstock using photo finish strips die collection (simple strip) and also cut a piece of patterned paper from Hello Friend 6" Glitz Paper Pad (which happens to have shades of fine linen, kraft and melon berry) using the same die that I then cut thinner than the scarlet jewel strip.  I cut out the tiny tags die and stamped "love" from the Tiny Tags stamp set in a ink similar to scarlet jewel.  I tied the tag onto the strip using twine.  I adhered the strip to the card base using dimensional adhesive and lastly I "sprinkled" sequins in colors that reminded me of melon berry.

There you have it.  That is all from me tonight as it is time for sleep.

Happy creating,
Shay.

Love card
Supplies:
Stamps: Label Basics and Tiny Tags, Papertrey Ink
Ink: soft stone, Papertrey Ink; raspberry jam mid-tone shadow ink, Hero Arts
Cardstock; earthstone, Neenah Paper; scarlet jewel and kraft, Papertrey Ink
Patterned Paper: Hello Love 6" Glitz Paper Pack, Glitz Design
Other: photo finish strips die collection and tiny tags die, Papertrey Ink; hemp twine; sequins; dimensional adhesive; Crop-A-Dile Corner Chomper, We R Memory Keepers

February 10, 2013

Papertrey Ink's 6th Anniversary: Sketch Challenge

Dear Reader,

I am back with a couple of cards I created using the card sketches over on Nichole Heady's blog for Papertrey Ink.  You can find the sketches HERE.  I decided to try my hand at Sketch No. 2 and Sketch No. 3. 


For Sketch No. 2 I was immediately reminded of the free printable by Heather Nichols that I had not yet had an opportunity to use.  I also happened to have a piece of vellum I had cut earlier in the day using the doubled-ended banner die from vellum and from there this card practically made itself!  I embossed birthday from Botanical Silhouettes with white embossing powder and then I inked the vellum with spring rain and aqua mist inks to get it the light happy blue that mimicked the blue I was covering up on the printable.  I folded the banner for more dimension and that made it easier to attach to the printable without seeing the adhesive.  The printable is adhered using dimensional adhesive to a kraft panel that I notched with 3/4" circle punch on each side.  I tied some hemp twine around the notches and adhered the kraft panel to a white card base with dimensional adhesive.


For Sketch No. 3 I decided to use the XOXO border die to create the v pattern.  I cut the XOXO four times from dark chocolate, pure poppy, raspberry fizz and hibiscus burst card stock.  I love that one of the remnants from the die are several dots.  I used one of each color dot on the bend of the v which I adhered with dimensional adhesive.  I then added a little bling onto each dot.  For the last touch to the card I stamped the sentiment in raspberry fizz ink from Heart Prints.

And there you have it.  I hope you had a delightful weekend and that your Monday is a brilliant beginning to your week.

Thank you so much for visiting!

Happy creating,
Shay.

Supplies:
Stamps: Botanical Silhouettes (limited edition) and Heart Prints, Papertrey Ink
Ink: VersaMark, Tsukineko; spring rain, aqua mist and raspberry fizz, Papertrey Ink
Cardstock: white, Georgia Pacific; white (printable), Neenah Paper; kraft, dark chocolate, pure poppy, raspberry fizz and hibiscus burst, Papertrey Ink
Paper: vellum
Other: opaque white embossing powder, JudiKins; double-ended banners die, Papertrey Ink; 3/4" circle punch, Stampin' Up!; hemp twine; dimensional adhesive; XOXO border die, Papertrey Ink; clear jewels

February 8, 2013

A Peek at What's Featured on The Aviary

Dear Reader,

You can find me today blogging on Paper Wings Productions' blog, The Aviary.  I am featuring handmade Valentines like those given and received in elementary school.  I have such warm and happy memories of them and thought I would whip some up for family and friends.

Here are some peeks:


To see more please visit The Aviary.
 
Thank you for taking the time to visit!

Happy creating,
Shay.

February 7, 2013

Papertrey Ink's 6th Anniversary Free Printables: Dawn McVey

Dear Reader,

Yes, I am back for more tonight.  I think this will do it even though I would love to use more of the printables offered by Papertrey Ink's designers in honor of their 6th anniversary.  Time and energy does not permit.  You can see my first card HERE and more information about the printables HERE.

My next card uses the birthday printable by the talented and bright Dawn McVey.  I really admire her bold, colorful and dynamic designs and projects.  I don't have her skill, but I hope my card honors a bit with the pops of sensational leaf green and Hawaiian shores with a touch of chocolate brown thrown in for good measure.


I decided to mount the printable on the simple circle die from Limited Layers: 1 3/4" circle dies cut from chocolate brown and then I mounted in onto a piece of patterned paper by Basic Grey cut with the Mat Stack 2 die and inked on the edges with dark chocolate ink.  The printable stack was then adhered to a piece of die cut cardstock using the Wine Bottle Tag die that I then stamped with the Background Basics: Newsprint stamp using dark chocolate ink.  I colored it in with tumbled glass and a little broken china and dark chocolate inks on the edges.  I added three brads I colored in with Copic markers.  All of this was adhered with dimensional adhesive to a card base of new leaf cardstock.  Lastly I added a piece of Basic Grey patterned paper die cut with the Edgers #1 Die Collection to the bottom of the card.

Another look:


And a close up shot:


Thank you so much Dawn McVey for years of crafting goodness!

And thank you for stopping by to visit.

Happy creating,
Shay.

Happy Birthday to You Card
Supplies:
Printable: Dawn McVey/Papertrey Ink
Stamps: Background Basics: Newsprint, Papertrey Ink
Ink: dark chocolate, Papertrey Ink; tumbled glass and broken china, Tim Holtz Distress Ink by Ranger
Cardstock: new leaf, Papertrey Ink; white, Georgia Pacific
Patterned Paper: clippings 6x6 paper pad, Basic Grey
Other: Mat Stack 2 die, Wine Bottle Tag die and Edgers #1 Die Collection, Papertrey Ink; With Love flower brads, Making Memories; BG07 Petroleum Blue and B06 Peacock Blue markers, Copic


LinkWithin

Related Posts with Thumbnails