June 30, 2013

Avery Elle's June AEI♥U Challenge Part No. 2


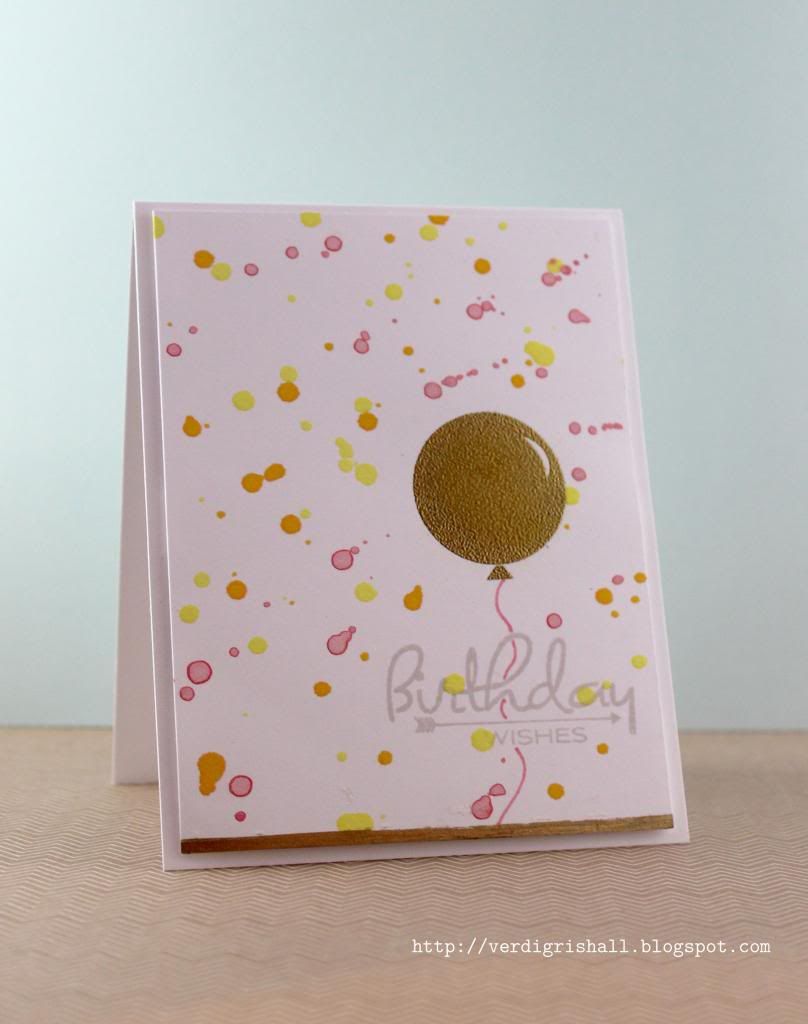
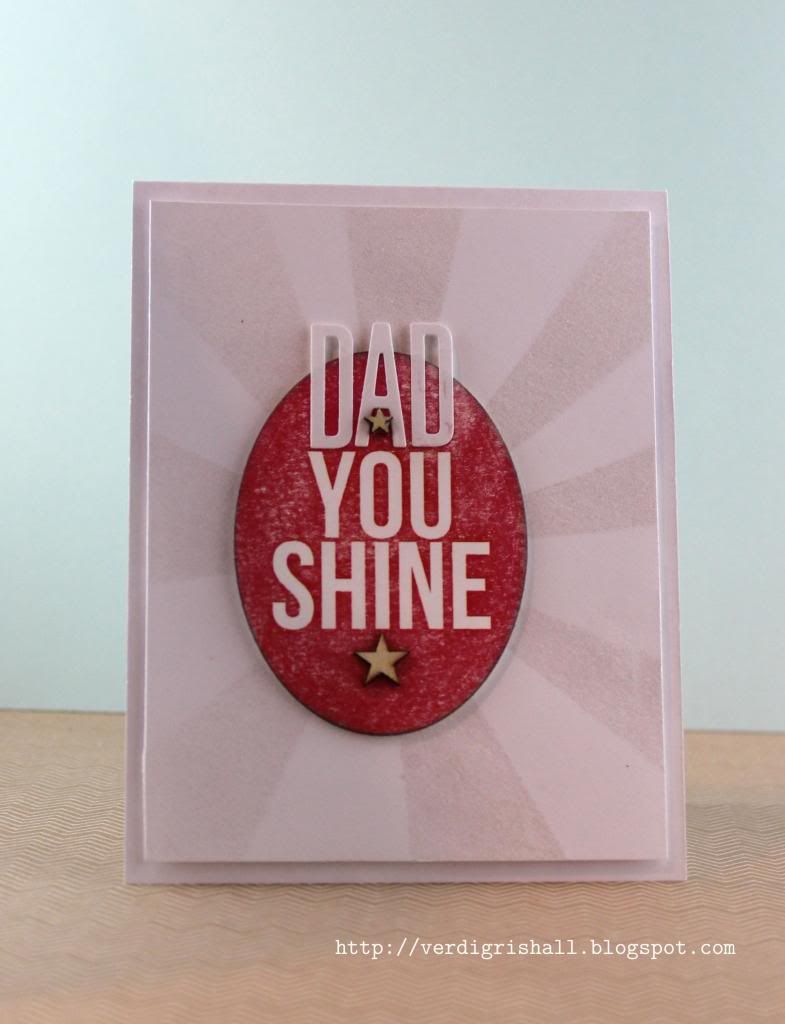
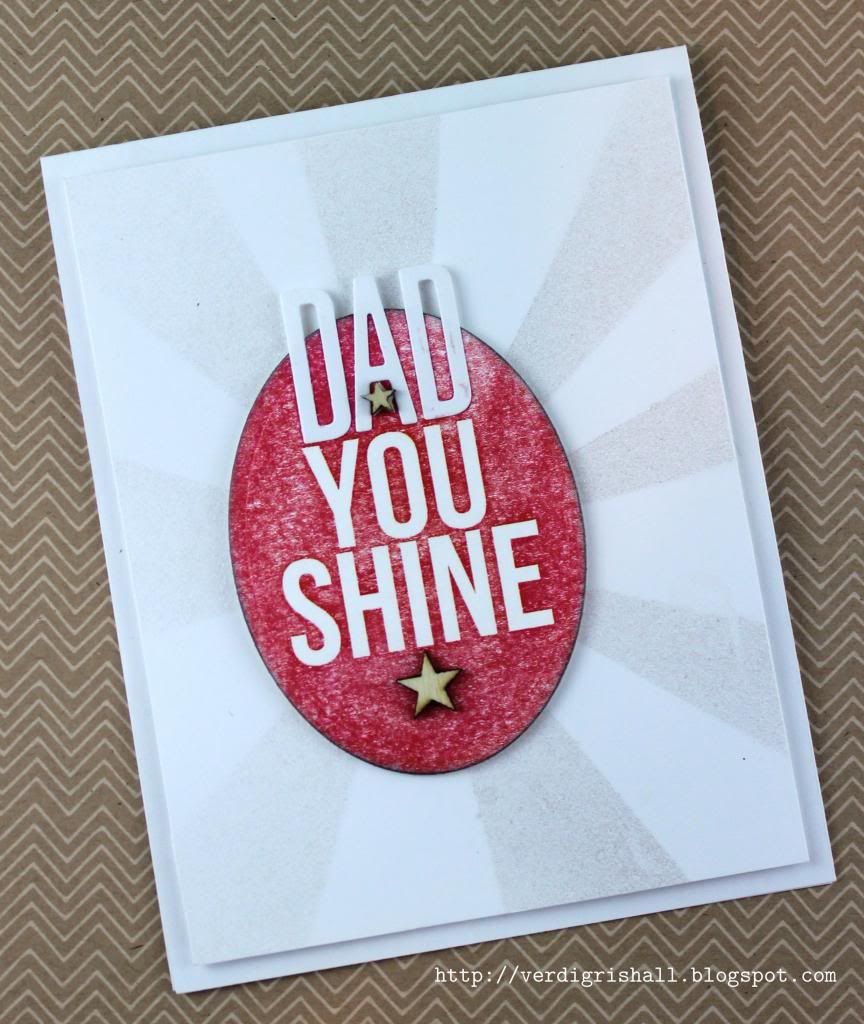
Happy Sunday!  As I am on a crafting/blogging roll, Thursday night I made a second attempt at the Avery Elle's June AEI♥U Challenge.   You can find my first attempt HERE


This time around I began with the adorable smaller tag from the Simply Tags: Everyday die designed by uber talented Nina Yang (yes she created the sketch above too).  I cut 4 tags out of the My Girl 6x6 paper pad by American Crafts...such a sweet collection with pretty summery colors.  I added some grey and white baker's twine to each tag.  Now this is when things got dicey.  I ended up playing around with these four tags a lot.  And I mean a lot.  Some cards come together quickly and easily and others just don't.  This one was hard fought.

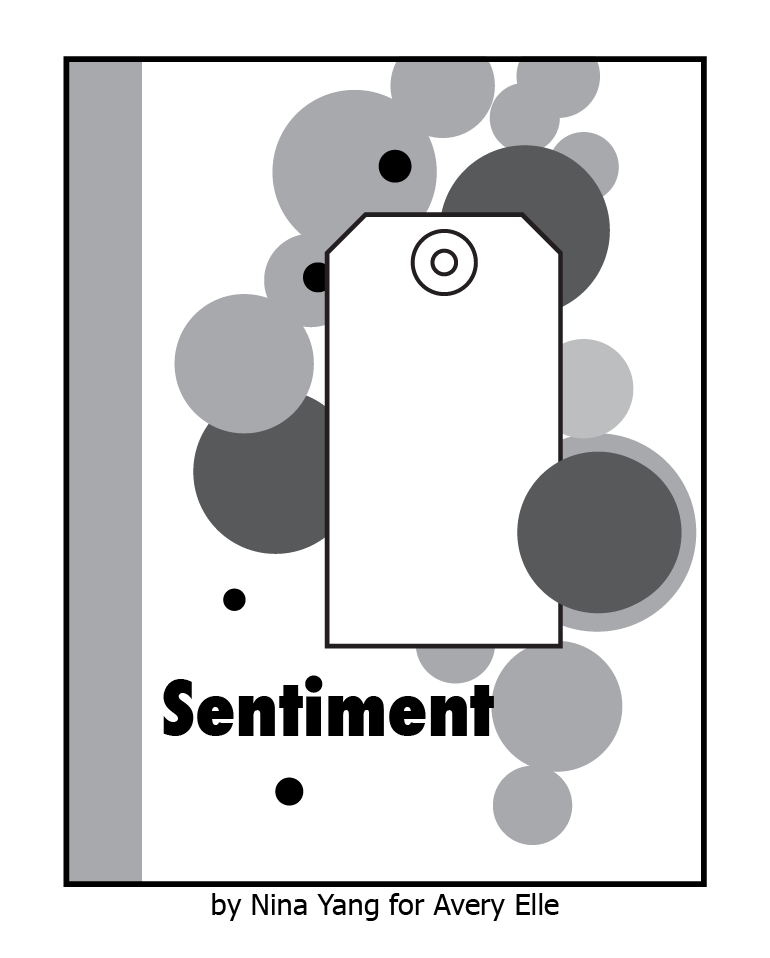
Here's the great sketch by Nina Yang again:

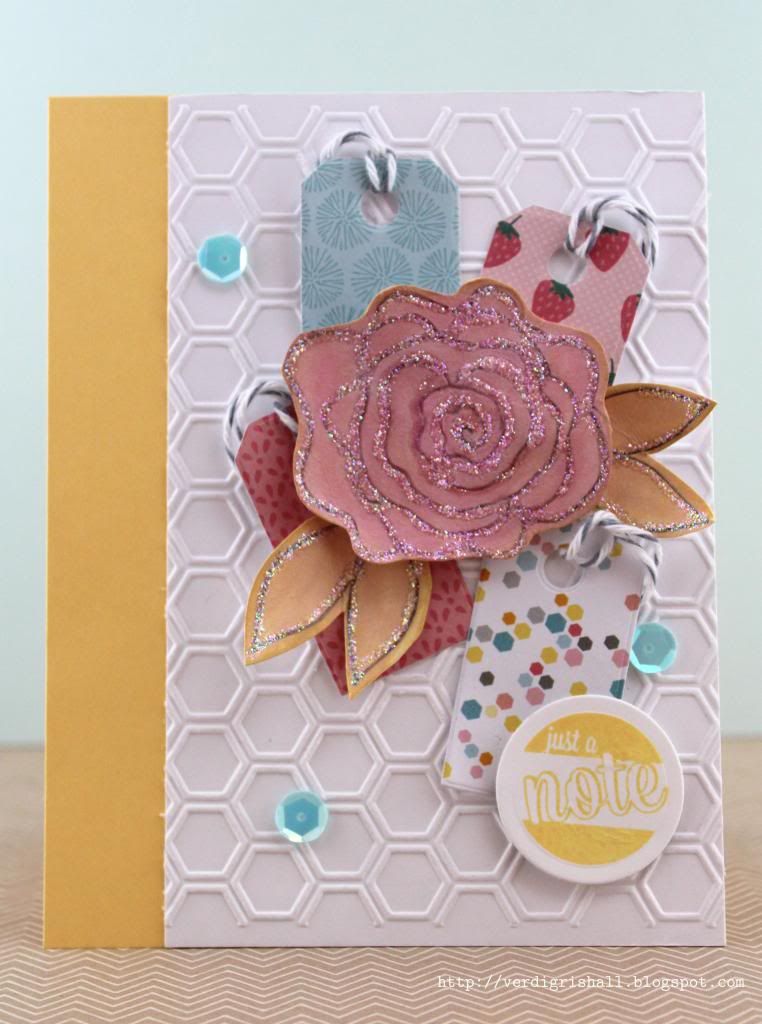
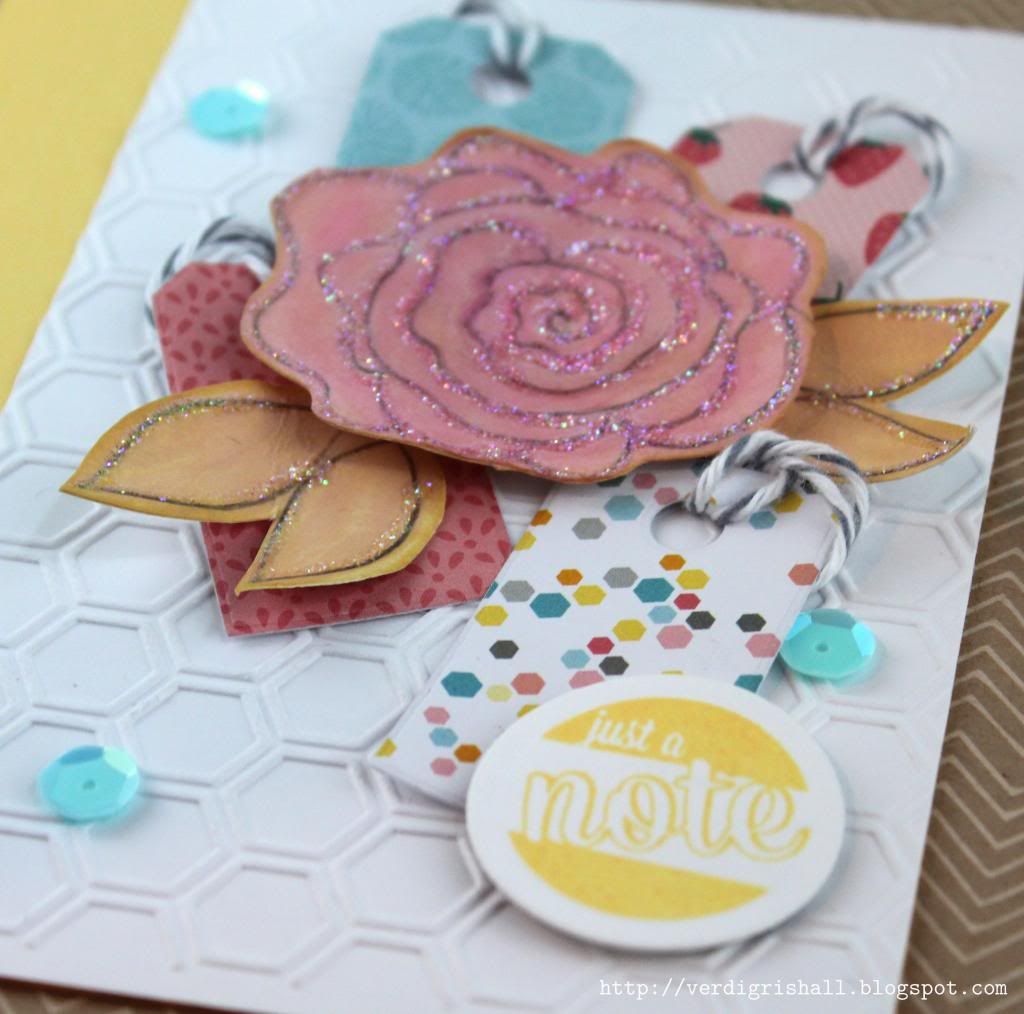
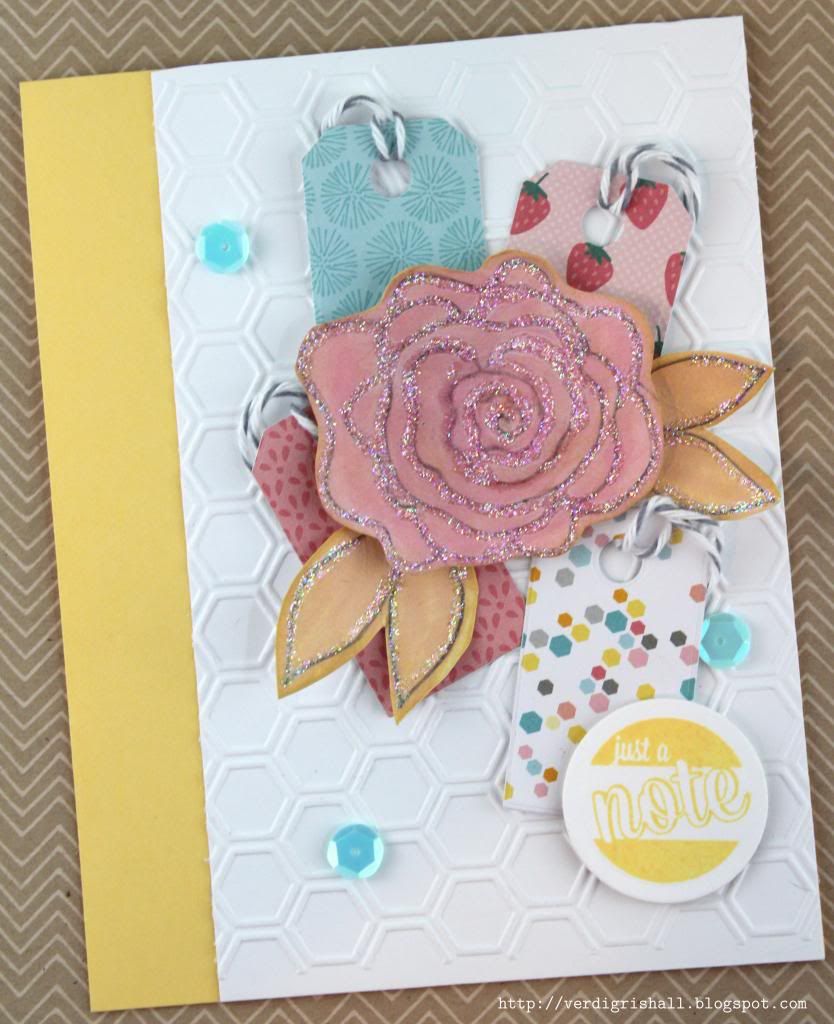
I decided to emboss the white panel with a nifty honeycomb embossing folder which mimics the hexagons found on the multi-colored hexagon patterned paper.  I pulled out the yellow from the hexagon patterned paper and stamped the sentiment from Air Mail and then die cut it out. 


A little digression, if I may.  Mail and travel themes go for my jugular.  They slay me.  I can't resist them.  Seriously, can...not...resist.  So imagine how thrilled I was with Air Mail.  More thrilled than the camel on hump day.  Watch out as I have a We R Memory Keepers Envelope Punch Board coming my way and I have not even scratched the surface on this baby!  End of my little digression.


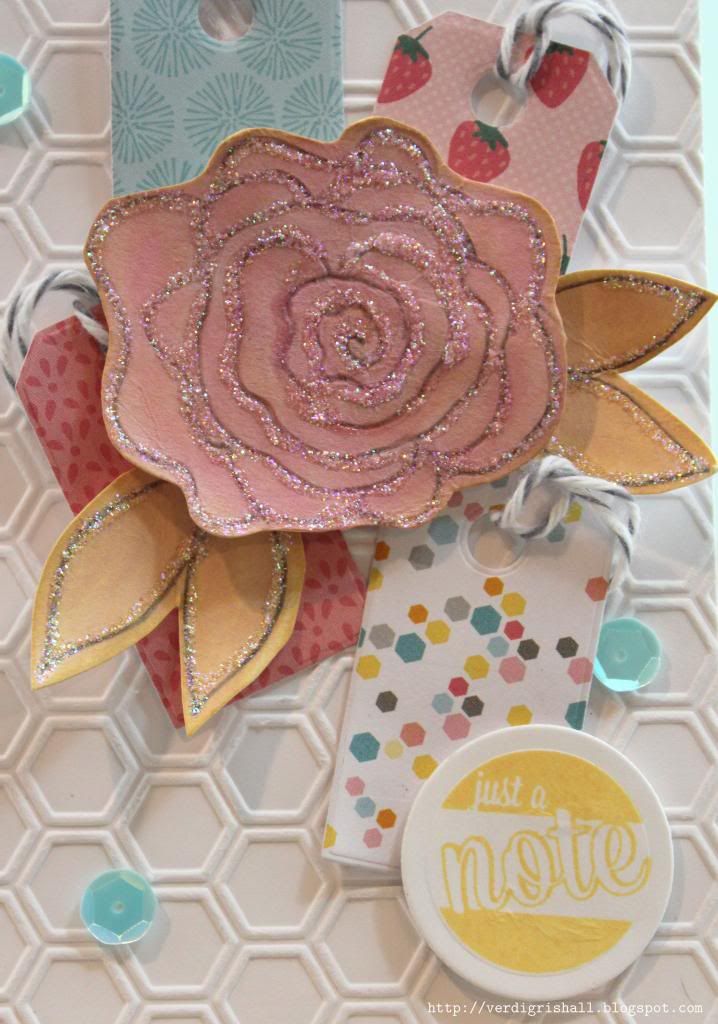
After placing the tags on the panel I figured what it needed was a central image.  I went through chipboard, pages of stickers, cabochons and diecuts until I found a lovely diecut from the Amy Tangerine/American Crafts' Yes, Please collection Bits (die cut cardstock shapes).  It was adorable, but not the right colors and a tad big for what I needed.  Still it was a jumping off point.  (Note to self: next Avery Elle order add Petals and Stems).


Here's my inspiration by Amy Tangerine/American Crafts from the Yes, Please collection:


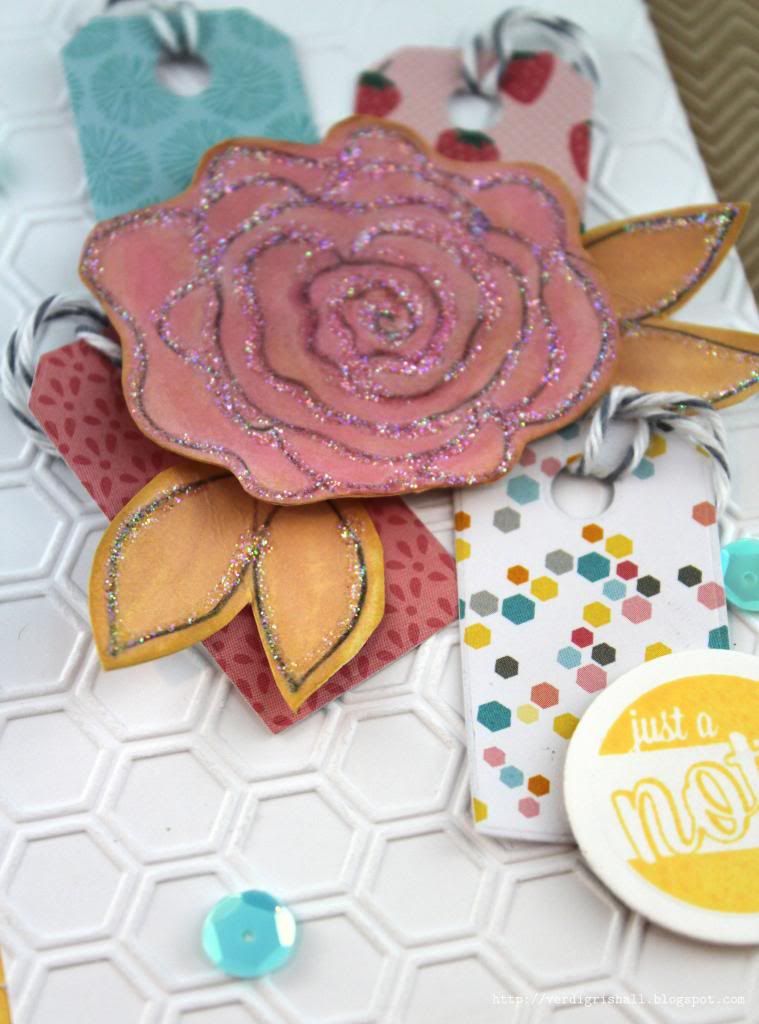
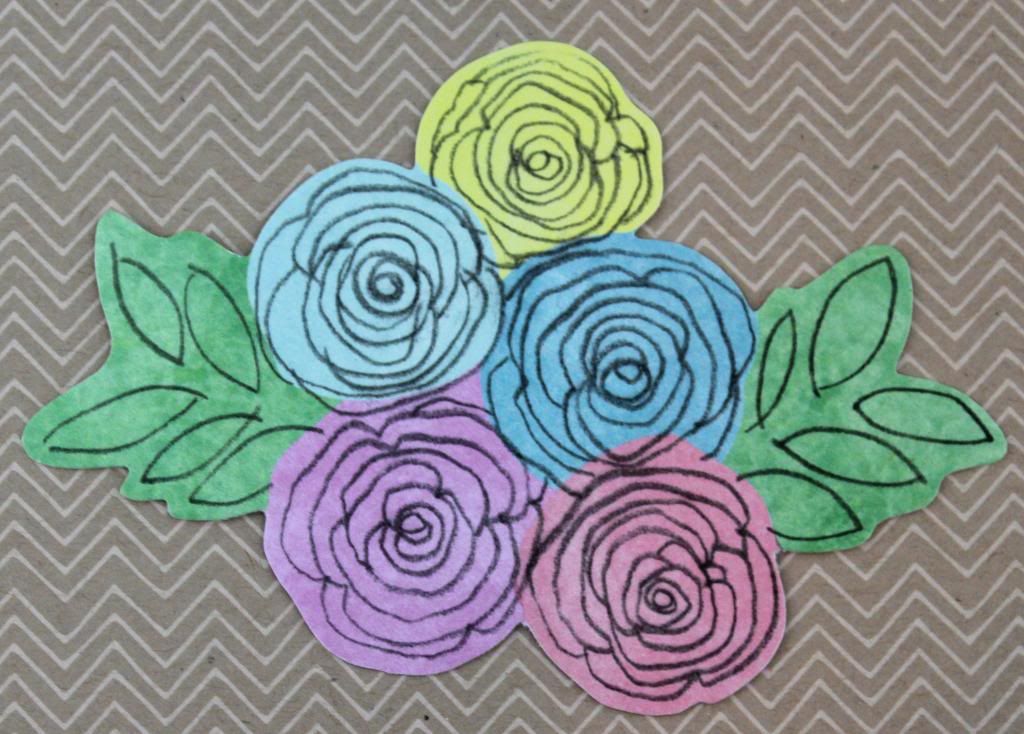
I got out a pencil and drew a rose and some leaves in a similar fashion, painted it in with watered down Distress Markers and to get the right tone distressed the flower with Distress Inks.  Now I was getting somewhere!

I adhered everything down onto the white panel.  Then I added some aqua blue sequins (needed some sequins!) and some stickles to the flower and leaves just for something extra.  Last I adhered the white panel to a yellow card base.


Voila!  The tale of a challenging card.  I hope you enjoy it and thank you for staying with me during my rambling.

Happy creating,
Shay.

Supplies:
Stamp: Air Mail, Avery Elle
Ink: harvest gold, Papertrey Ink; antique linen and scattered straw, Tim Holtz Distress Ink by Ranger
Cardstock: stampers select white, Papertrey Ink; yellow, stash
Patterned Paper: My Girl 6x6 paper pad, American Crafts
Die: Simply Tags: Everyday die, Avery Elle
Other: Cuttlebug, Provo Craft; Honeycomb embossing folders, Lifestyle Crafts; circle nestabilities dies, Spellbinders; baker's twine, Whisker Graphics; pencil; worn lipstick, spiced marmalade and barn door, Tim Holtz Distress Markers, by Ranger; paint brush; water; Inkssentials ink blending tool, Ranger; aqua sequins, Studio Calico; star dust stickles, Ranger;dimensional adhesive

June 27, 2013

Making the Move From Google Reader

July 1st marks the end of Google Reader and like many I am shuffling to find an alternative.  One is Bloglovin' which allows you to follow blogs and make a very seemless switch from Google Reader. 

I am including a new way to follow my blog through Bloglovin':

 Follow my blog with Bloglovin

I am also on Feedly.  It is also very easy to transfer all of your information from Google Reader to Feedly.

Both Bloglovin' and Feedly are beautiful.  I figure if one way to follow a blog is good than two are better...you just never know which is sort of like packing extra underwear on trips.

Whatever you decide, make sure to do it before July 1st so you can transfer all of your information from Google Reader in just a few short minutes.

Happy creating,
Shay.

Avery Elle's June AEI♥U Challenge

Ever have some products parked in a shopping cart because you are eyeing them something awful, but the craft money is already spent?  This was me with Avery Elle for a few months before I vowed that I would buy something.  When they sweetened the offer for their first anniversary with an adorable free stamp set, Party Animal, I knew the time had come.  That stamp set was way too cute to pass up!  For your information, the offer is good until the end of this month, June 2013 {wink}.  Let me also assure you that their customer service is excellent! 

Avery Elle has a monthly AEI♥U Challenge that I am finally going to enter using this great card sketch:

I took a chance and went with purple.  I decided to mix the purple with a lot of white and touches of grey and silver.  Here is what I created:


I used a mix of stamps and dies from Avery Elle and just had fun playing around.  I love the Chevron Border die and used the little diamond pieces from inside the die designed by JJ Bolton (for more examples on how to use this die and others check out JJ Bolton's blog).  I plan on experimenting with this awesome die some more!  Another fun stamp set with matching dies are the Simply Tags: Everyday stamp set and dies designed by Nina Yang (who also designed that cool sketch above).  I used the larger tag die which I embossed and stamped the sentiment in purple only to stamp over it with VersaMark and emboss with silver embossing powder.


For the subtle background behind the diamonds I stamped the ikat chevron (love!) from Ikat Additions in grey.  This stamp set is a doozy and under $5.00!

One last picture where you can see the silver of the embossed sentiment a little better:


So the moral of the story is that if you have been itching to buy some Avery Elle products I recommend doing so before July 1st or any time really as you won't be disappointed.

Thanks for taking the time to visit!

Happy creating,
Shay.

Supplies:
Stamps: Ikat Additions and Simply Tags: Everyday, Avery Elle
Ink: weather vane and lavender sachet, Jenni Bowlin for Ranger; VersaMark, Tsukineko
Cardstock: solar white, Neenah Paper
Patterned paper: Hero Arts
Dies: Simply Tags: Everyday ELLE-ments and Chevron Border ELLE-ments, Avery Elle
Other: Zig Zag embossing folders, Lifestyle Crafts; Cuttlebug, Provo Crafts; silver embossing powder, Ranger; jewels and pearl, Hero Arts; dimensional adhesive

June 26, 2013

www.verdigrishall.com

Woo hoo!  A little thing, but a big step for the blog.  verdigris hall now has its own domain!  Yes, you can now find this blog at www.verdigrishall.com (or verdigrishall.com) without the pesky blogspot.

Thank you so very much for joining in on this little voyage of mine and I hope you continue to visit often!

Happy creating,
Shay.

June 25, 2013

Papertrey Ink's June 2013 Blog Hop Challenge | Touch of Gold


Welcome you oh-so-talented Papertrey Ink enthusiasts!  First, I have to say you rock.  No, I am not just saying it.  Every single one of you are a treasure!  Not only do you create gorgeous projects, but you also take the time to visit and leave sweet comments.  Thank you.  

I loved the challenge this month for Papertrey Ink's June 2013 Blog Hop:


Here are my takes on the challenge:

Card No. 1 | Embossing Powder


Card No. 2 | Gold Leafing Pen


Card No. 3 | Shimmer Cardstock


Card No. 4 | Washi


Card No. 5 | Glitter Tape


That's it from me.  I know I will be dazzled by what everyone else makes this round...I tell you I can't even imagine what marvels I will see!  Thank you so much for taking the time to visit.

Happy creating,
Shay.

Supplies:
Stamps: birthday style, mini blooms, wonderful words: hello, happiness in bloom and bountiful banners, Papertrey Ink
Ink: VersaMark, Tsukineko; soft stone and ocean tides, Papertrey Ink; evergreen bough and antique linen, Tim Holtz Distress Ink by Ranger; malted milk, Jenni Bowlin for Ranger; pale tomato, Hero Arts Shadow Ink
Cardstock: stamper's select white, kraft and gold shimmer, Papertrey Ink
Patterned Paper: road trip, Papertrey Ink
Other: headline alphabet die, double-ended banners die, wonderful words die collection, simply jane die collection, bountiful banners die, Papertrey Ink; Cuttlebug, Provo Craft; detail metallic gold and opaque white embossing powders, JudiKins; heat embossing gun; buttercup and sherbet Mister Huey's Color Mists, Studio Calico; pink balloon sprinklers, October Afternoon; gold washi; sewing machine, Brother; brown sugar glitter tape, American Crafts; bubblegum memory marker, American Crafts; gold leafing pen, Elmer's; Inkssentials ink blending tool, Ranger; doily; dimensional adhesive

June 24, 2013

Man Oh Man Monday No. 16 | Remember Smile

Hello there my friends.  How is this Monday treating you? 

For today's MOMM I decided to pull out the arrowheads 6x6 stencil/mask by Prima Marketing, my ink blending tool and pumice stone Distress Ink to create my own background paper.  I added some stamping of the Plano stamp by Studio Calico/Hero Arts over the arrowheads for a little more interest.


I also printed out another set of journaling cards from Hey There by my new best digital designer, Emily Merritt Designs.   I don't know Emily Merritt, but I sure do dig her journaling cards!


I first went with the triangle yo. because it is cool and works well with the arrowheads design, but then I did some sewing (or too much sewing) on the card and it just wasn't working for me anymore so I went with the speech bubble journaling card and paired it with the ephemera from Pink Paislee's Portfolio collection that happen to be in colors that work great with the card (maybe due to my printer changing the colors of the cards).

I rounded one of the corners of the journaling card and adhered the journaling card to the card base using dimensional adhesive.  Lastly, I rounded all the corners of the card base.

 
I think this card would be great for encouraging some guy either when he's going for interviews, working on a big project or having some troubles at home, school and/or work.  It could even be used to say hello.

I hope you are encouraged to create something fun for the guys in your life.

Happy creating,
Shay.

Supplies:
Stamp: plano, Studio Calico/Hero Arts
Ink: pumice stone, stormy sky and tumbled glass, Tim Holtz Distress Ink by Ranger
Cardstock: white, Georgia Pacific; solar white, Neenah Paper
Other: ephemera from Portfolio collection, Pink Paislee; Arrowheads stencil/mask, Prima Marketing; Inkssentials ink blending tool, Ranger; dimensional adhesive; Crop-A-Dile Corner Chomper, We R Memory Keepers; bluebell "smile" enamel dots from The Sweetest Thing collection, My Mind's Eye

June 21, 2013

Dear Mama Elephant

Dear Mama Elephant:

How do you do it?  How do you make such cleverly designed stamp sets that are nearly impossible not to covet?  My bank account does not thank you one bit.  I do though.  How could I not?  You have an adorable typewriter that works for men and women which I used to make a simple birthday card for my younger (don't ask by how much) cousin who plans on becoming a writer.  Perfect?  Yes, indeed Type It was.  You can even just stamp it right on your cardstock with the little separate sheet of paper without losing one iota of its beauty.  I also love the little typed sentiments...happy b-day. and to you. are just right.   Let us not forget the ever useful, Trifecta because I certainly have not!  I reach for that baby when I want some filler without it being fussy and still trendy.

Any success of my card I contribute to your designs:


I am looking forward to inking up more of your stamps and adding to my growing collection (again angering my bank account).  Should you like to give me special sneaks of upcoming releases for a very biased reaction, don't hesitate to ask.  I am on it!

A fan,
Shay.

Supplies:
Stamps: Type It and Trifecetta, Mama Elephant
Ink: weather vane, Jenni Bowlin for Ranger; raspberry fizz, Papertrey Ink
Cardstock: white, Georgia Pacific; raspberry fizz, Papertrey Ink
Patterned paper: Soleil 6x6 paper pad, Basic Grey
Other: sequins, Studio Calico; pearls, The Paper Studio; doily

June 19, 2013

Man Oh Man Monday No. 15 | Birthday Card with Layers

Hello there!  Man Oh Man Monday comes to you a smidgen late this week...only 2 days.  Geez.  I won't go into detail, but we lost one of our beloved dogs.  Now that I am able to see through the trail of tears and have stopped wailing (slight exaggeration for dramatic effect), I wanted to share a birthday card I made back in the fall of last year for an uncle of mine.


Don't ask me too many questions on what I did and what I used because I am sort of fuzzy on both.  I do know I was going through a phase of using layers of die cuts and patterns.  The journaling cards are from Studio Calico as is most of the stamps.  I think the die cuts come from My Mind's Eye and possibly Studio Calico too.


The inside (I can't recall where the happy stamp comes from):


Note to self: when using a strip with stars actually use a strip with full stars.

That's it from me for the moment.  Enjoy your day!

Happy creating,
Shay.

Supplies:
Stamps: celebrate from Twisty Slide Add-On Kit and chevron arrow from Couple's Skate Add-On KitStudio Calico; date roller stamp, American Crafts; birthday wishes from Central High Card Kit, Lawn Fawn for Studio Calico
Ink: brushed corduroy and spiced marmalade, Tim Holtz Distress Ink by Ranger
Cardstock: white, Georgia Pacific 
Patterned Paper: No Limits 6x6 paper pad, Heidi Swapp
Other: die cuts, My Mind's Eye and Studio Calico; tiny attacher, Tim Holtz; Inkssentials ink blending tool, Ranger; Crop-A-Dile Corner Chomper, We R Memory Keepers

June 10, 2013

Man Oh Man Monday No. 14 | Father's Day Edition No. 6

We continue on with Father's Day as it is less than a week away.  Have you gotten your card done or bought?  

I am putting a tiny spotlight on hybrid Father's Day cards today.  Hybrid simply means using something created on a computer (digital) and then printed to make something physical.  You can create the digital design/sentiment yourself, purchase other people's designs from various online stores or create something for yourself using purchased designs.  There are some truly amazing digital products and designers out there.  For recommendations, let me know because I can do a detailed list.

For the cards today I started with Shine, this digital journaling card product by Emily Merritt Designs:


This mix of journaling cards has it all: feminine, masculine and gender neutral for young and older alike for all sorts of occasions with bright happy colors.  Included are convenient pdf files for easy printing of the journaling cards. I printed out one of the pdf files. My printer makes everything look distressed (a positive spin on the lack of quality) so don't assume that your print quality will be as poor as mine.  I just go with it until I get it fixed.  If you like the distressed look I have found that using an eraser on the image...well...for lack of a better word...erases some of the ink.

I chose to make cards from the "you shine" and "you light up my life" journaling cards.  I am still on a sun ray/sun burst kick so these cards are inspired by that idea as well.

Card No. 1

For you shine I cut the sentiment using an oval die and decided to use my Studio Calico burst mask with Mister Huey's Calico Shine on white cardstock for a cool subtle tone on tone look.  I added "dad" using the Headline alphabet die and a couple of star wood veneers.  Simple, bold and interesting. 


Truly, in person the shine looks really cool.


Card No. 2


For You Light Up My Life I decided to add a cute light bulb from a Lawn Fawn stamp set made for Studio Calico's Spencer's Card Kit.  I pulled out some new mustard embossing powder to emboss the image.  I also did some sewing on this card as I had the sewing machine out still after this project.  I am still a bit shocked by how easy it was to sew on paper.  Maybe I am finally mature enough to sew!  I am only about 1 or 2 decades behind everyone else (as usual).   I used the Headline alphabet die once again and added a touch of shimmer and interest by adding stickles to the "pop".


Fun, colorful and easy.

I may or may not be around again for a bonus MOMM Father's Day Edition this week because I recently received some new stamps that are meant to be inked up!  If I don't, I hope you have a delightful Father's Day celebrating the fathers/father figures that have enriched your life!

Happy creating,
Shay.

P.S. I am submitting these cards to the Simon Says Stamp Challenge blog for Masculine/Father's Day.

P.S.S. You can find me on Paper Wings Productions' The Aviary tomorrow for Tutorial Tuesday.

Supplies:
Digital product: ShineEmily Merritt Designs
Stamp: from Spencer's Card Kit, Lawn Fawn for Studio Calico 
Ink: Versamark, Tsukineko; black soot, Tim Holtz Distress Ink by Ranger
Cardstock: solar white, Neenah Paper; stamper's select white, Papertrey Ink; white, Georgia Pacific
Patterned Paper: Snippets 6x6 paper pad, Studio Calico
Other: Mister Huey's 12x12 burst mask, Studio Calico; Mister Huey's Calico Shine, Studio Calico; sewing machine, Brother; oval nestabilities die, SpellbindersHeadline alphabet die, Papertrey Ink; Cuttlebug, Provo Craft; star dust stickles, Ranger; mustard Zap! embossing powder, American Crafts; star wood veneer, Studio Calico; Crop-A-Dile Corner Chomper, We R Memory Keepers; dimensional adhesive; embossing heat gun; Inkssentials ink blending tool, Ranger

June 8, 2013

Dear Sassafras

Dear sassafras aka Tim and Beck:

How I love your unique designs full of vintage touches, quirkiness, humor and flamboyant color combinations.  I find your products beautiful, intriguing and fun to use (I don't like to play favorites, but Sunshine Broadcast is one of my all time most beloved collections *ever*).  Case in point, Soleil which you designed in collaboration with Basic Grey last year (it happens to be on sale on Basic Grey's website right now).  I love it.  I love it even more today than I did when I first saw it displayed on my computed screen on Basic Grey's blog when they unveiled their Summer CHA 2012 collections.  And I love that I can mix in a stamped flower I had sitting on my work table from a previous doomed card to create something wholly new for my friend's birthday.  I decided to let myself be free as your designs foster creative adventures.

Here's my card which was delightful to make, although I am not sure it does your designs justice:


I plan to use Soleil all over the place and if I could I would wallpaper my room in your paper.  That isn't much of a hyperbole....as I type it I am considering whether I could wallpaper a wall of my room with your paper, but I hate to wallpaper...the preparation, the glue that doesn't quite work or works too well, the air bubbles, arms raised for long moments above the head and most of all the thought of in the future when I may want to/have to change things removing said wallpaper.  Will you be disappointed if I don't wallpaper my room with your paper?  Instead I may just place your papers in frames to hang on the wall.

You are awesome.  I hope to see many more of your designs in the future (please!!!!), but until then I will be (not at all like a crazy person) fervently admiring (soon in frames) and occasionally even using my vintage sassafras stash.

A fan,
Shay.

By the way, if you want a chance to win some free art products including stamps this weekend, check out my Paper Wings Productions' Design Team Blog Hop post HERE.

Supplies:
Stamp: Funky Florals (limited edition), Papertrey Ink
Ink: harvest gold, Papertrey Ink; bubble gum, orange soda, stone wash, Hero Arts Shadow Ink
Cardstock: white, Georgia Pacific; piece of cardstock previously sprayed with mists
Patterned paper: Soleil 6x6 paper pad, Basic Grey
Other: tag sale #3 die collection, Papertrey Ink; Cuttlebug, Provo Craft; element stickers and title stickers from Soleil collection, Basic Grey; doily; dimensional adhesive; Inkssentials ink blending tool, Ranger

June 7, 2013

Paper Wings Productions' June Design Team Blog Hop


WELCOME to the “Summer Fun” Paper Wing Production's Design Team Blog Hop & Giveaway!  If you've arrived here from The Aviary, then you're in the right place.  If you’re just stopping by for a visit, I’d love for you to check out our hop...you will not be disappointed!  I am honored to be the first stop for this blog hop!

This month we’re sharing some “summer fun” themed projects.  So sit back, grab yourself something cold to drink or better yet some ice cream or frozen yogurt and enjoy a little Paper Wings Productions summer inspiration!  Oh and let’s not forget about the blog candy!!  This month we’re giving away a gift certificate to the Paper Wings Production’s online store AND there will be some blog candy along the way!!  
For a chance to win, all you need to do is:
  • be a follower of the Paper Wings Productions blog, The Aviary
  • visit each of the participating designer's blogs and leave them some love. Then go back to The Aviary and leave a comment letting them you completed the hop. 
  • to increase your chances of winning, like the Paper Wings Productions Facebook page and/or invite your friends to the hop. 
  • then just come back and let us know! Be sure to leave a separate comment for each of the additional entries. 
The winner will be announced on Tuesday, June 11th, 2013 on The Aviary.

When I was brainstorming ideas for Summer Fun, I hit upon one of my favorite ways to spend hours upon hours: reading.  I thought why not create a book cover to disguise those steamy paperbacks that are so much fun to read?  I know there are ebooks, but sometimes a good old fashioned book is just the thing poolside, on the beach, in a car, on the plane or sitting in the cool air conditioning.  


I started with Claudine Hellmuth's 8.5" x 11" sticky-back canvas thinking I would do some image transferring.  In the end though I used the sticky-back canvas like a big fabric sticker.

Here is what I did (big surprise this is pretty wordy):

I freehand drew a sun ray pattern on a cardstock panel which measured 8.5 inches high by 4.25 inches wide (in the end the project ended up being 8 inches high as I didn't need as much height).  I numbered each of the parts and then cut them out (I cut each shape out twice as I made two panels for the front and back).  I used those pieces as patterns to trace onto pieces of patterned paper from the Basic Grey|Sassafras Soleil collection.  


I stamped the sun from Earth and Sky or Sunrise and a line from Window using yellow ink onto the half circle shape.  The largest center ray piece I stamped over with the Backgrounds or Circles background and Writing Backgrounds or Writing stamps.  I adhered (using some liquid glue) each sun and its ray to a piece of cardstock measuring 8.5 x 4.25 inches using the numbers from the pattern pieces as guides.  Don't worry if things aren't perfect because you are looking for a handmade mismatched look anyway.    

On the piece of sticky back canvas, I measured 0.5 inches on each of the right and left sides to be folded over as flaps to fold into the book to keep the book cover over the book.  I actually cut two one inch wide strips from patterned paper for these sections.  I measured for center and decided to create an inch wide spine that I then cut out from patterned paper.  Removing the backing to the sticky-back canvas and with the sticky side up, I placed the center strip at 5 inches (it will then take up the place of 5 inches to 6 inches on the canvas).  The panel I wanted as the front cover I placed on the right side butting up next to the center/spine 1 inch strip of patterned paper. I placed a one inch strip to the right side of the front panel.  Next I placed the back panel to the left of the center strip and finished off by adding the last one inch strip to the left of the back panel.  I lined up the panels to the bottom of the sticky-back canvas as any cutting I would be doing would be to the top of the canvas.  Happy with the placement, I used a bone folder to burnish the paper onto the canvas.  I cut any overhang of paper from the canvas and added some strips of brown sugar glitter tape on the spine for more interest. 

Then I actually got out the sewing machine.  This should garner a response of shock and awe as the sewing machine and I have a very peppered past.  Anyone aware of my sewing abilities knows I have a much better relationship with the seam ripper.  I want to assure you that I was very pleasantly surprised by how easy it was to sew on this project. If I can do it, ANYONE can do it!  I went to town sewing all over the canvas.  Have fun trying different color thread, different stitches, free style stitching as this is the perfect type of project to play with the sewing machine or if you are able and willing hand stitching.  


Next I stamped "here comes the" from Funky Lower Case Alphabet with blue/purple ink on white cardstock.  I cut out each letter as little blocks not worrying about size or straight lines.  Then I stamped "sun" using Funky Alphabet (the uppercase version) in yellow ink and cut out the entire word as one block.  I used a little liquid glue to adhere each letter to the front panel.  I placed a strip of brown sugar glitter tape down under the sun block.  I then sewed across each word.


At this point you can add more stamping, sewing, painting, doodling, embellishments or not.  When you are happy with it, I recommend for more durability painting on a few layers of modge podge or soft gel medium to seal the piece. 


This book cover will fit those odd long paperbacks or a paperback of around 350 pages.  I think that if you used a 12x12 inch piece of sticky-back canvas or used more than one 8.5 x 11 inch sheet you could make a wider book cover for thicker books or even one that fit trade paperbacks and/or hardcover books.  This would be fun to make again and the possibilities are endless on how you could decorate it! 


Now you can hide that guilty pleasure of a book (Fabio-like men hidden from prying eyes) behind your artsy book cover or give one to a friend with a book or books and/or gift card as a considerate gift.  If you try out this idea, please let know because I would *love* to see it!

Now, make sure you check out each and every stop on the hop starting with the very talented lady that makes all things Paper Wings Productions possible, Carrie Avery.

***Here is the complete line up just in case you get lost along the way***

It has been an absolute delight to have you visit me today and I hope this helps kick start an amazingly creative and fun summer!

Happy creating,
Shay.

Supplies:
Stamps:

Ink: squeezed lemonade, scattered straw, wild honey, dried marigold and worn lipstick, Tim Holtz Distress Ink by Ranger; butter bar and stone wash, Hero Arts Shadow Ink
Cardstock: stamper's select white, Papertrey Ink
Patterned Paper: 6x6 Soleil paper pad, summer daisy and mermaid from Soleil collection, Basic Grey
Other: sticky-back canvas, Claudine Hellmuth Studio by Ranger; sewing machine; brown sugar glitter tape, American Crafts; Quick-Dry Adhesive, Scotch


LinkWithin

Related Posts with Thumbnails