January 30, 2013

Winter Wonderland: Lawnscaping Challenge No. 50


Dear Reader,

I am making a last minute entry into the Lawnscaping Challenge No. 50 Winter Wonderland.  Lawn Fawn is adorable and the ladies of Lawnscaping are adorable so how could I not be motivated to make something?

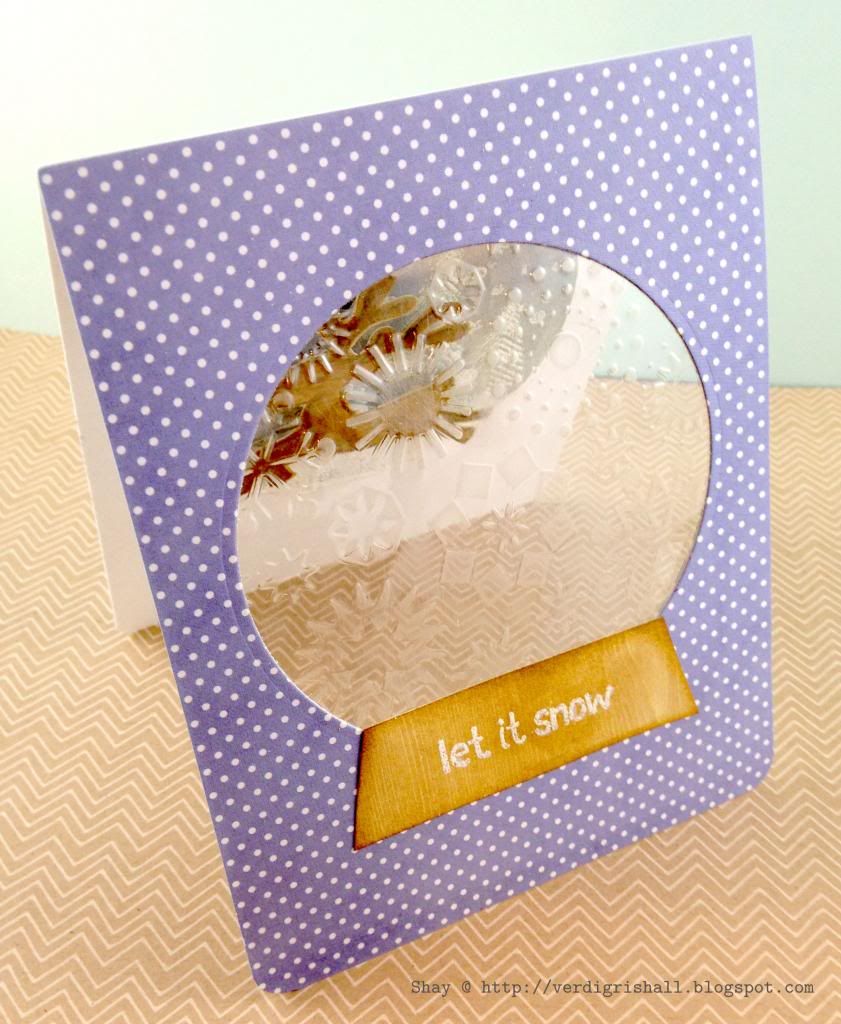
I also realized that this little number is going to be entered into Moxie Fab World's Make a Card with a Window Challenge (Challenge No. 60).  Love when these sort of serendipitous occurrences happen!

I am suddenly back into embossing and putting my embossing folder collection to work!  This morning I saw a video by My Craft Channel about embossing acetate and decided to give it a whirl.

Here is the card I cooked up:


Because I added dimensional adhesive behind the little reindeer you can see the white from inside the card, but it still looks pretty cute.  The gold embossing on the reindeer doesn't really show up too well...in real life it is a sweet little touch all colored in with Tim Holtz Distress Markers.

Perhaps you can see the gold a bit better here as well as the scene behind the acetate:


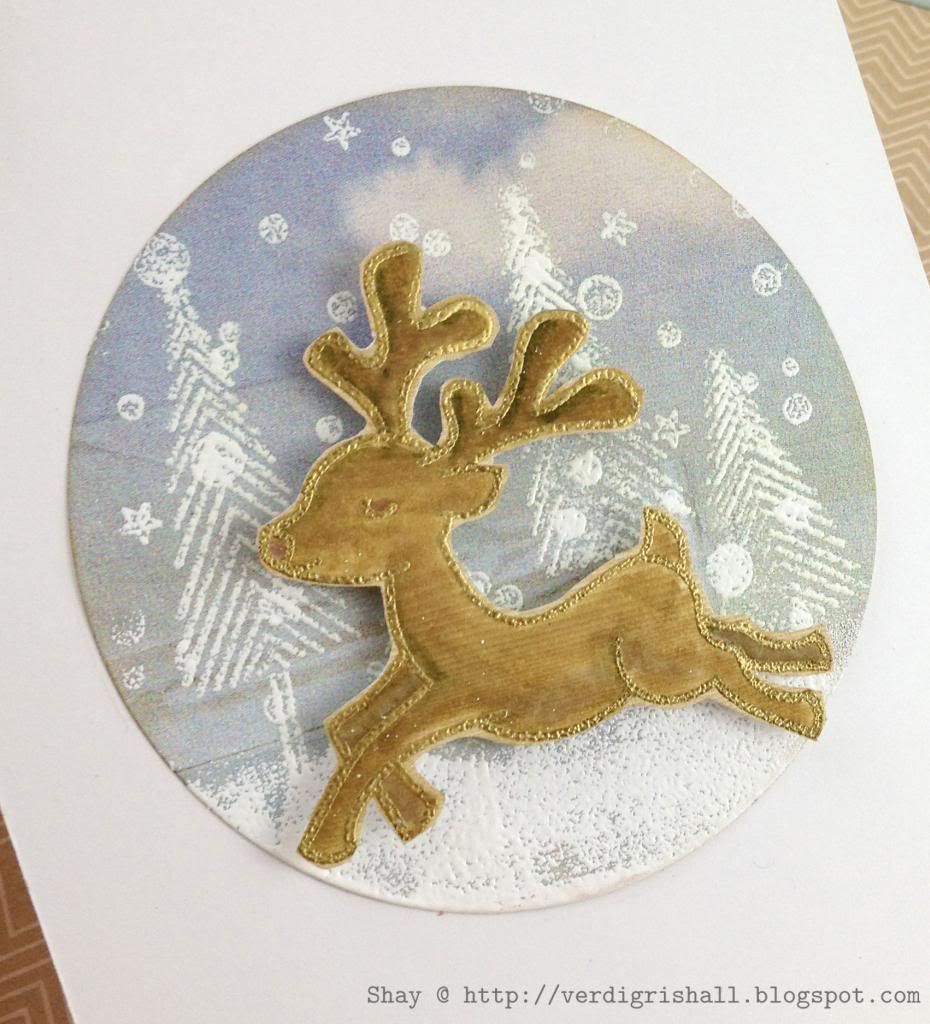
I used Let It Snow and Critters in the Snow by Lawn Fawn for this little number with lots of white embossing powder and Versamark on some unusual choices of paper from Basic Grey's Soleil 6x6 paper pad and the wood grain from Studio Calico's Heyday 6x6 paper pad.  With some additions of a Spellbinder's circle Nestabilities die and winter themed Cuttlebug embossing (I did sand it lightly to help the pattern show a bit better).

Here is a little better view of the embossed acetate:


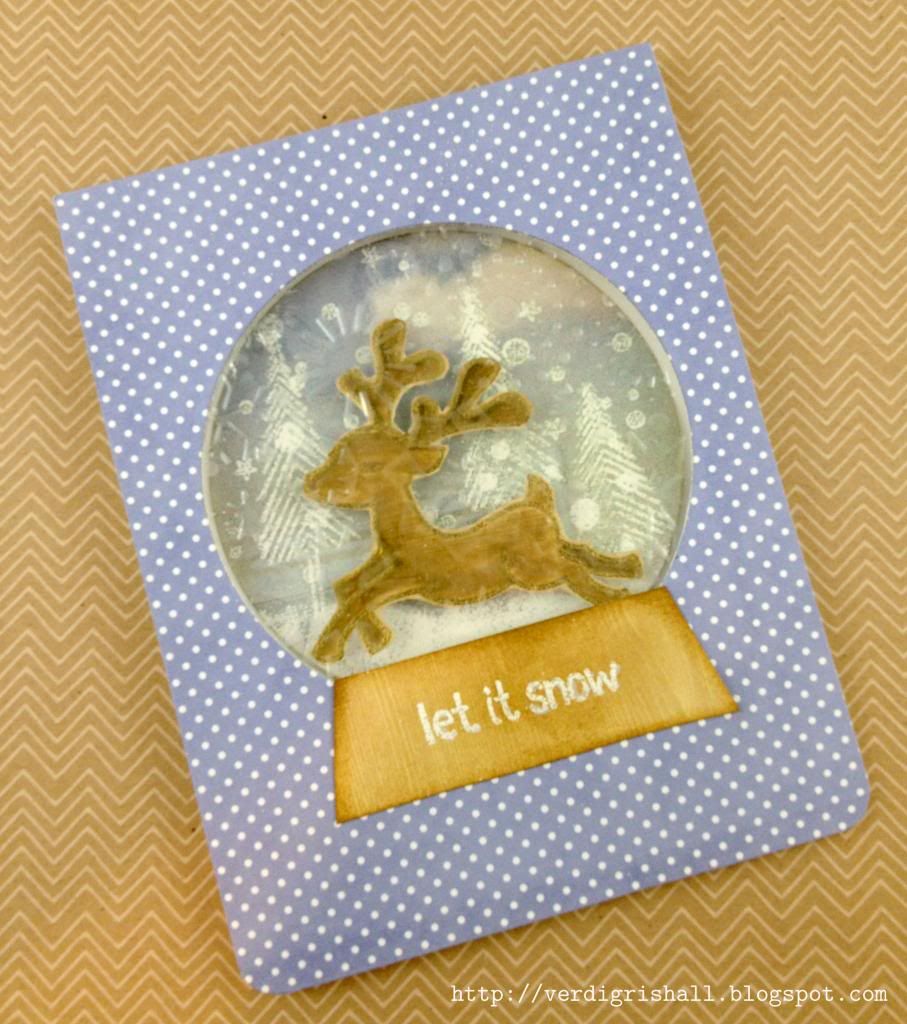
And a last look at the card:


I am bit pressed for time so that's it from me tonight.

Thank you so much for stopping by to visit!

Happy creating,
Shay.

Let It Snow Snowglobe Card
Supplies:
Stamps: Let It Snow and Critters in the Snow, Lawn Fawn
Ink: Versamark, Tsuineko
Cardstock: Georgia Pacific
Patterned Paper: Soleil 6x6 paper pad, Basic Grey; Heyday 6x6 paper pad, Studio Calico
Other: opaque white embossing powder and detail metallic gold embossing powder, JudiKins; Tim Holtz Distress Markers, Ranger Ink; Corner Chomper, We R Memory Keepers; circle Nestabilities die, Spellbinders; embossing folder, Cuttlebug; acetate from packaging

A Peek at What's Up at The Aviary

Dear Reader,

Today you can find me blogging away on The Aviary doing a masculine spin on Valentine's Day cards.  Here is a peek (or two) and for more information please visit The Aviary.


Also, make sure to check out the The Aviary this Friday for another Blog Hop bursting with love themed inspiration!

Thank you so much for visiting!

Happy creating,
Shay.

January 29, 2013

Belated Birthday Card

Dear Reader,

It may seem redundant that I have another card for a guy for you today.  In fact I crave making a girlie card at the moment so maybe I will have a Valentine's card session and pull out my doilies, hearts, ribbon, sequins, sparkle, lace, pink and all those items that I avoid when making masculine cards.


I find Studio Calico stamps often have a graphic feel that lends itself easily to creating gender neutral or completely masculine cards.  I was motivated to use the rectangle stamp from the Penn Station add-on after being inspired by Maile Belles in this card HERE (she is a marvel with stamps!).  After stamping in tuxedo black Memento ink, I colored in the rectangles with Copic markers and then cut the rectangles into rows that I adhered to the white card base a little haphazardly making sure to keep some space near the top for my sentiment.  The sentiment comes from Inside & Out: Birthday stamp set by Papertrey Ink and the "for you" comes from a limited edition birthday set from Studio Calico.


The inside uses pieces leftover from the outside.


Before I go I have a question for you: what are your go-to stamp companies/stamps for masculine or gender neutral cards?

Oh, and make sure to check out The Aviary this Friday for another awesome Blog Hop (think love)!

Thank you for taking the time to stop by.

Happy creating,
Shay.

Belated Birthday Card
Supplies:
Stamps: Inside & Out: Birthday stamp set, Papertrey Ink; rectangles from Penn Station add-on and for you from limited edition stamp set, Studio Calico
Ink: tuxedo black, Memento by Tsukineko; seed packet, Jenni Bowlin for Ranger
Cardstock: white, Georgia Pacific
Other: markers, Copic; circle punch, Stampin' Up!

January 22, 2013

Congratulations You Did It Graduation Card

Dear Reader,

I feel very blessed to have been named an honorable gnome for this past Lawnscaping Challenge (No. 49).  I was among a group of very talented stampers and you sure don't want to miss their entries.  Thank you to everyone who has commented on my card, it surely does brighten my day!

Now onto a bit of a companion card to the hybrid birthday card I shared with you Friday HERE.  I mentioned that I had Lawn Fawn's Dewey Decimal Petite Paper Pad out for a graduation card I made and this is that card.  The lad graduated from a college with the school colors of maroon and gold.  I found that one of the patterns in Dewey Decimal had a golden yellow and a maroon-like color in addition to aqua, teal, bright white and chocolate brown.  Perfect!  I also love the library/school theme to the Dewey Decimal which completely supports graduation and all the papers are from that paper pad.


I also pulled out several stamp sets from Papertrey Ink (mostly from the Tag-Its series which have great basic seasonal sentiments) to get some proper congratulatory sentiments.  I also tried out my Hero Arts Mid-Tone Shadow Ink in cup o'joe and butter bar...great coverage and color. Some finishing touches were gold washi to add a touch of the gold from the school colors (I added a strip of aqua and teal patterned paper over it because I didn't want *too* much gold) and a little teal lawn trimmings by Lawn Fawn which is a great accent for any gender.

Here is a more detailed shot of all the stamping and you can really appreciate the colors in that hexagon tile patterned paper (love!).


Inside the card in which I added a wide strip of some of my excess from the front of the card and stamping with the cup o'joe Hero Arts Shadow Ink along with aqua mist ink by Papertrey Ink:


That's a wrap on this card.  Thanks for stopping by to visit!

Happy creating,
Shay.

Congratulations You Did It Graduation Card
Supplies:
Stamps: Everyday Classics (retired limited edition); Tag-Its # 4; Tag-Its #6 and Fillable Frames #12, Papertrey Ink
Ink: cup o'joe and butter bar Mid-Tone Shadow Inks, Hero Arts; aqua mist, Papertrey Ink
Cardstock: white, Georgia Pacific
Patterned paper: Dewey Decimal Petite Paper Pad (6x6), Lawn Fawn
Other: Crop-A-Dile Corner Chomper, We R Memory Keepers; vivid triple pack cord lawn trimmings, Lawn Fawn; gold washi, Freckled Fawn (I think)

January 18, 2013

Dated: Hybrid Card for a Guy

Dear Reader,

How are you this fine Friday?   Exceedingly well I hope!

My mom was always big on sending birthday cards to family.  A few years ago I took over and began making handmade cards for my family (and friends although I was failed miserably last year...crash and burn style).

I am here today to share a masculine birthday card.  The first in a series I will be making this year.  Perhaps you remember the cards I made a couple of years ago which you can see again HERE (more than likely not)...I am using a similar philosophy this year as well.

I am a collector lover of digital products.  It is amazing the multitude of amazing designers out there.  It was actually a product by Designs by Lili (you may also know her as the designer of such marvels as Clementine Edition, Baby Editions, Jade Edition and Seasons Mini Kit of Project Life...she's good) that was the spark for this card's design (and those in the future).

Meet Date Circles 4 (Hint, hint: they and everything at The Lilypad (one of my favorite digital shops) are on sale this weekend--January 18-January 21, 2013):


Pretty darn cool, huh?  I love the dates, circular design and colors of these Date Circles 4.


I placed the images of all the months I needed onto a Word document and printed them out on a single sheet of white cardstock.  Our new printer is a little off in color (it must need adjustment) as the orange came out red and the red a little more of a pink-red, but regardless they are still cool.

I began with a white cardbase (my favorite) to begin the card.  I already had Lawn Fawn's Dewey Decimal petite paper pad (6x6 paper) out from another card (boy, this is has become a go-to paper collection) and I thought the aqua/teal would be great with the red January circle.  I also picked out a piece of patterned paper with numbers and circles from My Mind's Eye Miss Caroline collection (Dilly Dally "Celebrate" Token) in a wonderful grey...red, grey, white and aqua/teal a winning combination.  The red herringbone piece of paper came from Basic Grey's Clippings collection 6x6 paper pad.  All of these papers are cut into strips of various widths for interest and adhered to the cardbase.

I wanted to use the "happy birthday to you" from Studio Calico/Hero Arts stamp set Calico Borders and I also wanted to bring in more of the teal color.  I found to my delight that Tim Holtz Distress Ink by Ranger in evergreen bough is a perfect match.  I stamped it once on the teal strip and also on the red strip (it is hard to see but there subtly).

Using the reverse side of the My Mind's Eye Token paper (a cool ledger that coincidentally had the red and teal color too!), I stamped the woodgrain banners (woodgrain + banner = awesome) from the "Baby" stamp set from My Mind's Eye Miss Caroline Howdy Doody in wet cement Hero Arts Shadow Ink Mid-Tone, cut them out and adhered them together with my handy dandy Tim Holtz Tiny Attacher and then adhered them to the top left border of the card.


Lastly, I used the outline circle and solid circle from Cocoa Daisy's Day in the Life: Pick a Date Calendar stamp to highlight the day and year in the evergreen bough ink on red January calendar and then adhered it all to the card (making sure to cut off the overhang of the January circle) and I rounded the bottom right hand corner of the card.  By the way, check out Cocoa Daisy's stamps because they are pretty fantastic.


And there you have it, a personalized hybrid card for a guy (picture of the card in its natural habitat or place of origin aka my studio).


Thank you so much for taking the time to visit!

Have a brilliant weekend,

Shay.

Happy Birthday to You Birthday Card
Supplies:
Digital: Date Circles 4, Designs by Lili at The Lilypad
Stamps: Calico Borders, Studio Calico/Hero Arts; Baby from Miss Caroline collection, My Mind's Eye; A Day in the Life: Pick a Date Calendar stamp, Cocoa Daisy
Ink: evergreen bough, Tim Holtz Distress Ink by Ranger; wet cement, Hero Arts Shadow Ink Mid-Tone
Cardstock: solar white, Neenah Papers; white, Georgia Pacific
Patterned Paper: Dewey Decimal Petite Paper Pad, Lawn Fawn; Clippings 6x6 Paper Pad, Basic Grey; Token from Dilly Dally "Celebrate" Miss Caroline collection, My Mind's Eye
Other: Tiny Attacher, Tim Holtz; Crop-A-Dile Corner Chomper, We R Memory Keepers 

January 16, 2013

Let's Party: Lawnscaping Challenge No. 49

Dear Reader,

In the effort to thicken my skin, push myself out of my comfort zone, develop my skills and use some of the new Lawn Fawn stamps I received for the holidays, I am entering a Lawnscaping Challenge for the first time.  That and I have been meaning to do it for ages now because it features adorable and clever projects. 

Lawnscaping Challenge No. 49 is all about celebrating Lawnscaping's birthday.


My inspiration came from the movie "Up" which I happen to love.  What is more fun than a house with a huge amount of pretty balloons allowing it to float in the sky? 


My color scheme came from a patterned paper from Studio Calico's (along with Tim and Beck aka Sassafras) Heyday 6x6 paper pad.  I stamped the house in brown sugar by Jenni Bowlin for Ranger from Sweet Christmas and then colored in sections of the house using Distress Markers. 

For the background I stamped a piece of white cardstock with the clouds from Sunny Skies in speckled egg by Jenni Bowlin for Ranger.  For a paler color on the background I stamped all the clouds after stamping off on a piece of scrap paper.  The scallop border is a border from Belinda's Borders that I felt mimiced the scallop design found on the patterned paper of the house that I stamped in brown sugar by Jenni Bowlin for Ranger on a piece of Crush paper from Studio Calico's Heyday collection.  I adhered it to the back of the cloud paper.

The balloons from Admit One are colored in with Distress Markers and highlighted a bit with a white Signo Uniball pen.  I like how the coloring looks streaky which somehow reminds me of a real balloon.  I attached the balloons to the card and drew in strings with my vintage photo Distress Marker.  I adhered the house on with foam adhesive.

The cloud panel was then adhered to a piece of orange cardstock (Stampin' Up! I believe).  The sentiment is from Sophie's Sentiments that I embossed using Tsukineko's VersaMark ink and opaque white embossing powder by JudiKins.

Here is a little more of a detailed shot of the card.  I think it turned out pretty cute and could work as an invitation or a birthday card (or any sort of celebratory event in fact).


 Happy birthday, Lawnscaping and I hope you enjoy many more years of challenges to come!

Thank you so much for taking the time to visit.

Happy creating,

Shay.

Let's Celebrate card
Supplies:
Ink: speckled egg and brown sugar, Jenni Bowlin for Ranger; VersaMark, Tsukineko
Cardstock: white, Georgia Pacific; orange, Stampin' Up!
Patterned Paper: Crush from Heyday collection and Heyday 6x6 paper pad, Studio Calico
Other: Tim Holtz Distress Markers, Ranger; white Signo pen, Uniball; opaque white embossing powder, JudiKins; foam adhesive, American Crafts

January 4, 2013

Paper Wings Productions January Blog Hop


Dear Reader,

Welcome dear Paper Wings Productions peeps!  It is a pleasure to have you join me here today for the first ever Paper Wings Production design team blog hop.  If you arrived from the fantastic Norma Gomez, you are in exactly the right place.  Haven't you been inspired by the fabulous new Paper Wings Production design team?

If you stumbled upon this post, I recommend heading over to the The Aviary for all the details on how to win some *blog candy*.  Make sure to leave some love along the way as you hop. 

The theme for this blog hop is friendship to celebrate the launch of new design team.  I decided to go with an idea that has been knocking around in my head for a while, has been popularized by Heidi Swapp (she calls hers memory files and they are pretty cool) and also uses up something that is now piling up at the office as we go digital: file folders.

I began with a plain white file folder, picked out the woodgrain patterned paper (a favorite of mine by Crate Paper), an older chevron paper from Basic Grey (from the Porcelain collection) along with a few papers from Dear Lizzy (mostly Neopolitan and a piece from 5th & Frolic) that I felt worked together.  From there I picked out an assortment of stamps to decorate my file folder and a few simple cards to stash in the folder as a little present for a friend (adding crafting supplies like stamps and/or a gift certificate/gift card would also be a lovely addition).

The cover is quite a mix of stamping, pieces of patterned paper plus a few other elements like silver glitter fabric tape, washi tape, half a doily, embroidery thread, white spray mist and a button.


The little typewriter came from the awesome Vintage Technology and really helped to convey the correspondence and vintage look for this project.  I stamped the "for you" from Sophie onto the little sheet of paper...so cute!  Under the typewriter are two other stamped images.  The two ended banner from Tabs and Banners which I stamped on the chevron paper and then the large half flower from Flower Power or Half Flower.


Directly on the file folder I stamped the flower from Flower Power and over stamped with the circle background from Backgrounds or Circles in the same ink color.  Over that I stamped "limited edition" from Limited Edition and the border from Details Framer.

 
The top of the file folder was also stamped with the flower from Flower Power and over stamped with the circle background from Backgrounds or Circles in the same ink color.  I created another little banner using Tabs and Banners on a piece of patterned paper and the sentiment is from Marcel.


I stamped the tab of the file folder first with Ledger Journaling Lines in aqua ink, stamped friend using Perfect Alphabet in fuschia ink and "handmade with" heart from the Handmade stamp set in pale pink ink.  I chose the outline heart and colored it in with a Copic marker.


For the inside of the file folder I had a lot of fun building a message to my friend using the Remember and Thankful stamp sets (I love these!), arrows from Evidence and I emphasized the sentiment with the second half of the doily and a sliver of the woodgrain paper and a little bit of silver glitter fabric tape.


On the right hand side of the inside of the file folder I added a pocket made from patterned paper.  Inside I placed the little cards made to coordinate with the file folder.  I ran washi tape up the inside seam of the file folder.  For a final touch I inked all the edges of the file folder.


A better view of the little cards.  Lately I have been really thrilled with the clean and fresh look of a white cardstock base with some pretty stamping and embellishments.  I love that when you choose a few pieces of paper for this project you can use little scraps to add a lot of interest to these little cards.  I used those little banners from Tabs and Banners nearly everywhere as they add the cutest punch of color and the little sentiments found in the Paperie Family sets fit nicely in them.  For mine on the cards I used Sophie.  To repeat the images used previously I used the circle background from Backgrounds or Circles, the flower from Flower Power and more images from Vintage Technology.  These cards could of course be dressed up more with jewels, brads, buttons, pearls, glitter, sequins, ribbon, twine, washi tape or any number of pretty items.  In fact adding a few items in the pocket would be a great way for your friend to customize the cards.


I hope this has inspired you to repurpose a file folder.  They are so much fun to decorate.  If you do create a project with a file folder, I would love to see it!

Now on to your next stop with Dana Tatar: http://datatar.blogspot.com/

If you lose your way on the blog hop, here is the list:

Amber Rasmussen - http://sew-ink.blogspot.com/
Shay - http://verdigrishall.blogspot.com/  <---You are here
Dana Tatar - http://datatar.blogspot.com/
And remember to return to The Aviary, become a follower and leave a comment.
 
Happy blog hopping,
Shay.
 
Supplies:
 

LinkWithin

Related Posts with Thumbnails